Pragmatic Audio PEQ
Pragmatic Audio PEQ
I have always been frustrated by the lack of a system-wide PEQ on iOS, and with iOS 27 that is finally changing.
There are excellent PEQ filters out there now. oratory1990’s presets, AutoEQ, OPRA and the measurement sites all give you a headphone-specific correction. Even so, it is still hard to get the sound that is right for your ears. A measurement is taken on a rig, not on your head, and your bass and treble preferences are your own. And once you do have a PEQ you like, it has to be in the path of everything you play. Apple Music, Tidal, Qobuz and Spotify have a basic EQ, and Roon has an extensive parametric one, but each only applies to what you play inside that app. Until iOS 27, an app could not sit in the system audio path at all.
So I built Pragmatic Audio PEQ. It is a system-wide parametric EQ for iPhone and iPad, and it needs iOS 27, so no older device can run it.
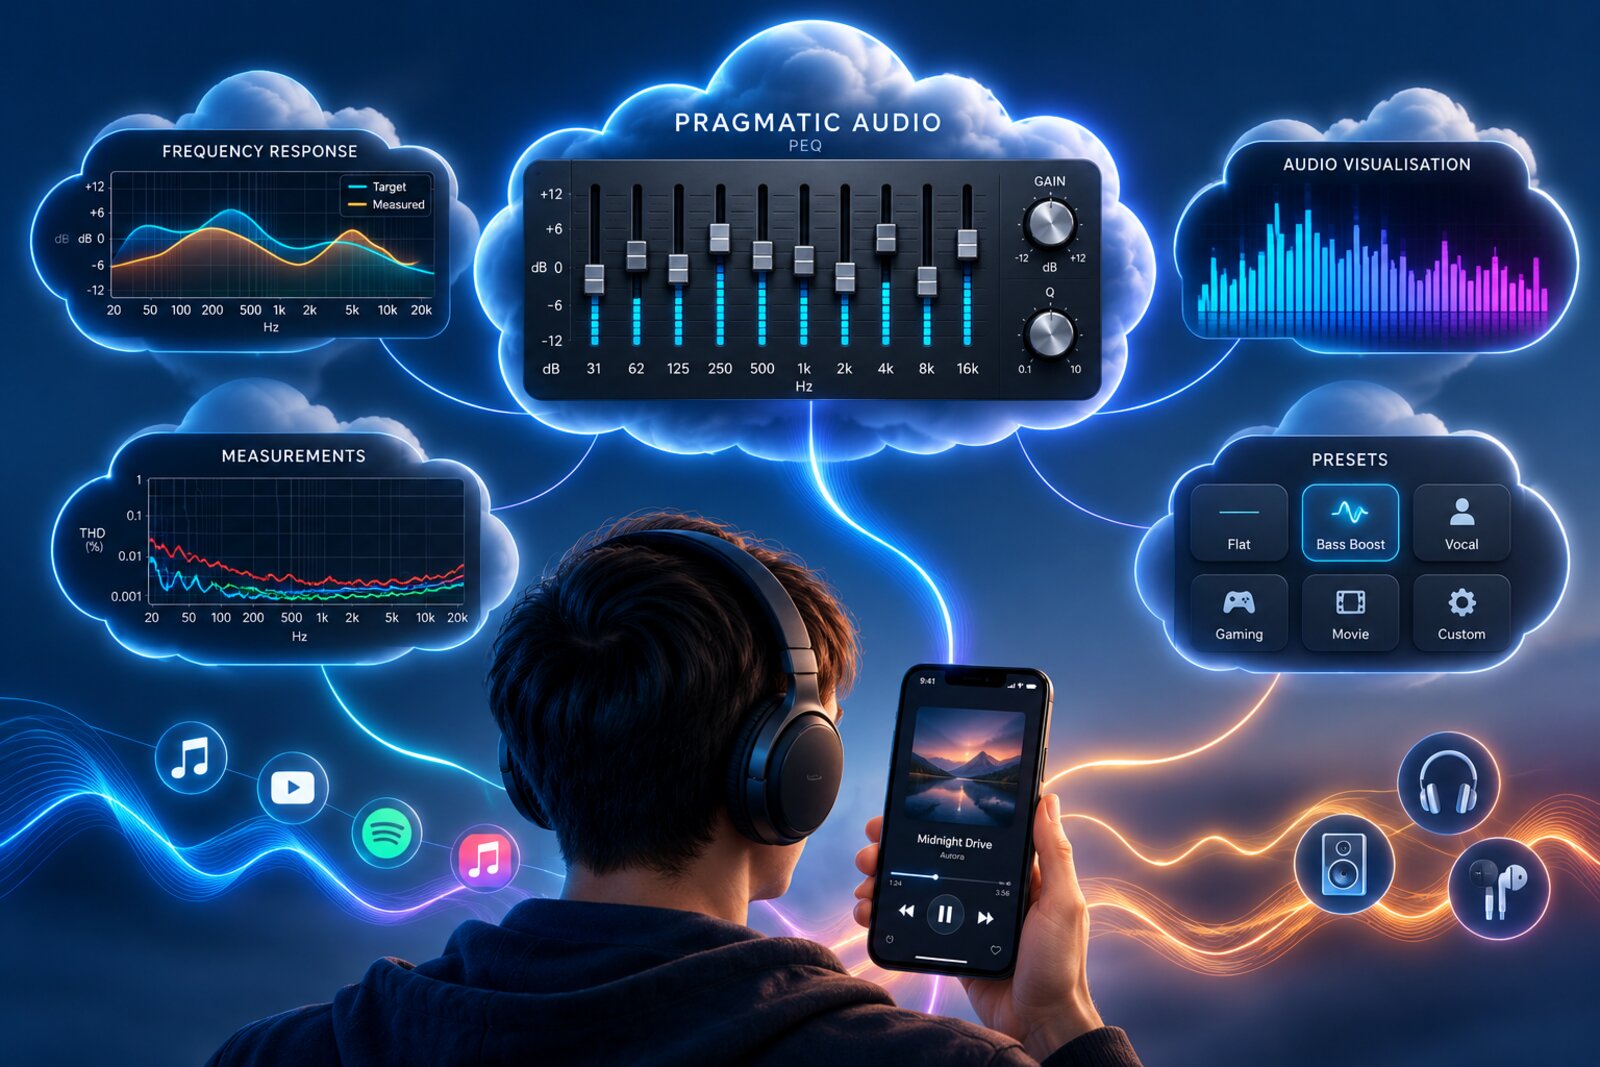 An illustration of the idea: music from any app passes through the PEQ, with your downloaded or personalised PEQ profiles, effects and visualisations on the way to your headphones or speaker.
Where it came from
The idea came from playing with EffectDeck, one of the first apps to use the new iOS 27 feature. That feature is a media device extension: a virtual audio output that appears in Control Center like a speaker. Choose it and iOS hands the system audio to the app, which processes it and plays it on through the headphones or speaker you were already using. EffectDeck is a very general-purpose audio filter, so I used the same technique to build something dedicated to PEQ, with crossfeed and a few other effects alongside it.
The key features
- System-wide parametric EQ. Choose “Pragmatic EQ” as the output in Control Center and what you play is equalised, in almost any app.
- Load a PEQ from OPRA (thousands of headphones and IEMs, with every creator credited), from the measurement sites through their Export button, or from a Filters.txt file.
- One PEQ editor. Drag the dots, change the width, type exact values, with each filter’s own effect drawn in colour, and hear every change live.
- Make your own. A simple bass and treble control, an advanced editor, and Uplifting PEQ, a listening process that tunes the treble above 4 kHz to your own ears.
- A bass and treble preference that sits on top of any PEQ and any headphone, and switches on and off from the Live Audio summary.
- A personalised library you can export, import and pin to your headphones, so your AirPods load their own PEQ when they connect.
- A/B testing, with manual volume matching, and a blind test with an exact binomial result.
- Effects: crossfeed, a tube amp and vinyl.
- Live visualisation, with eight views including a spiral, VU meters and Visual PEQ, which shows what the EQ does to your music as it plays.
- Headroom management: the preamp is set automatically from the filters, Smart headroom gives back volume where it safely can, an output limiter guards the peaks, and a volume hint tells you how far to turn up.
- iPad in two panes.
It needs iOS 27 and a physical iPhone or iPad, and will probably cost $4.99 on the App Store when it is released.
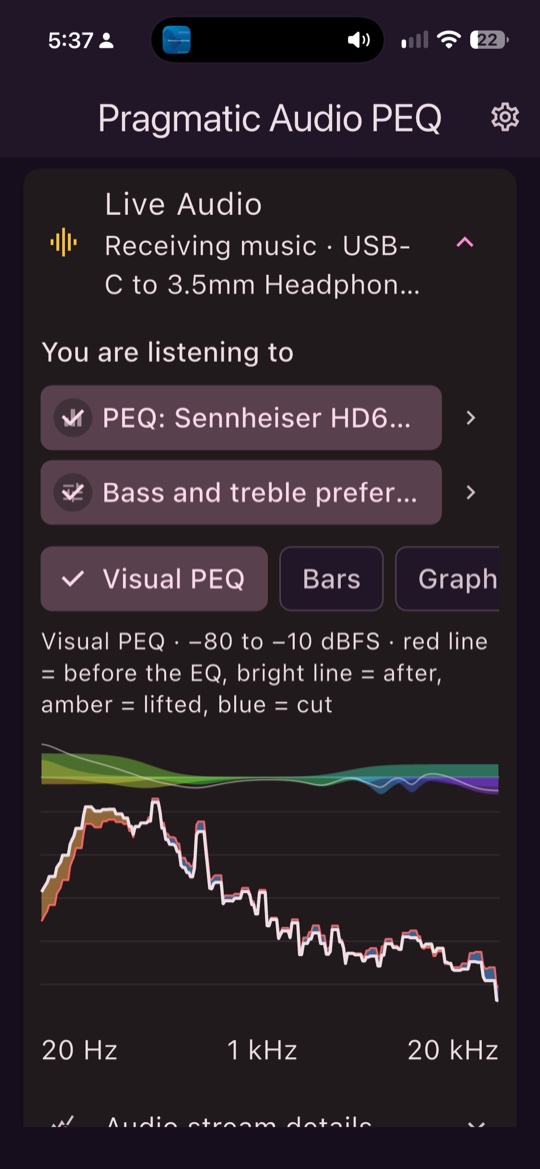 Pragmatic Audio PEQ on an iPhone, with music playing through it: the PEQ and the bass and treble preference are both ticked in the summary, and Visual PEQ is showing.
How it works
- With no PEQ loaded, it passes the audio through. Whatever output you were using carries on, only now by way of this app, so choosing it costs you nothing until you load something.
- You switch to it yourself. The app cannot make itself the default output. The switch is one trip to Control Center, and in my use it stays selected until the next reboot, however many music apps you move between. After a reboot you choose it again, and you can always switch back from the same place.
- The app has to be running. If you choose Pragmatic EQ and the app is not open, iOS returns to your previous output after about six seconds, rather than playing silence. Open the app, then choose it again.
- The format is fixed at 48 kHz. iOS hands system audio to an extension at one rate. Your music is converted to 48 kHz on the way in. That is not a loss for an equaliser, but it matters if you care about the sample rate end to end.
- Apps that play video may refuse the output. iOS, not this app, decides which apps may use it. If an app is playing video, or has a video loaded, iOS treats it as a video player, tries AirPlay instead, finds nothing and puts the output back. You see “Unable to Connect”. Spotify with Canvas on (the short looping video behind a track) is an example, even when paused: turn Canvas off in Spotify’s settings and restart it. YouTube may disconnect depending on its playback state. VLC is the one I found that does not connect at all; the logs show iOS activating the output and then dropping it with no audio from VLC arriving. The status card in the app has an (i) that explains this.
- The microphone is never used. iOS lists a microphone permission only because routing needs a particular audio session category (play and record). No audio is recorded, stored or sent anywhere.
The signal chain inside the app, in order, is: tube amp, vinyl, crossfeed, the EQ filters with a preamp, and an output limiter.
Getting started
- Open the app and leave it running.
- Start music in any app.
- Open Control Center, long-press the music card, and choose Pragmatic EQ (subtitle “System Wide PEQ”).
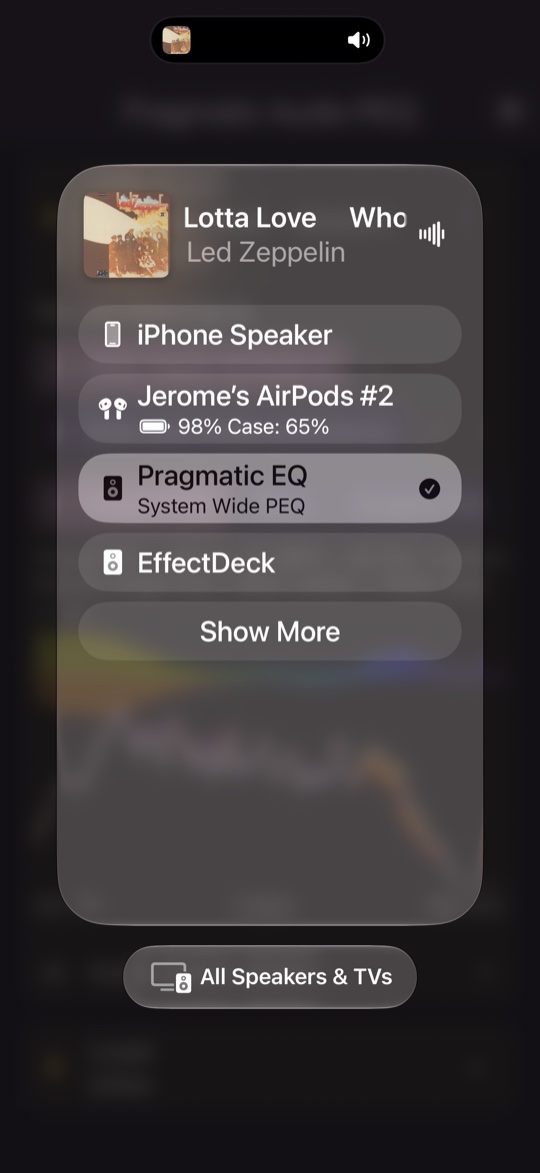 Choosing the output in Control Center. “Pragmatic EQ” is ticked.
Back in the app, a Live Audio section appears at the top once the connection is made. Until then the app shows a status card that tells you what to do and what has gone wrong, if anything.
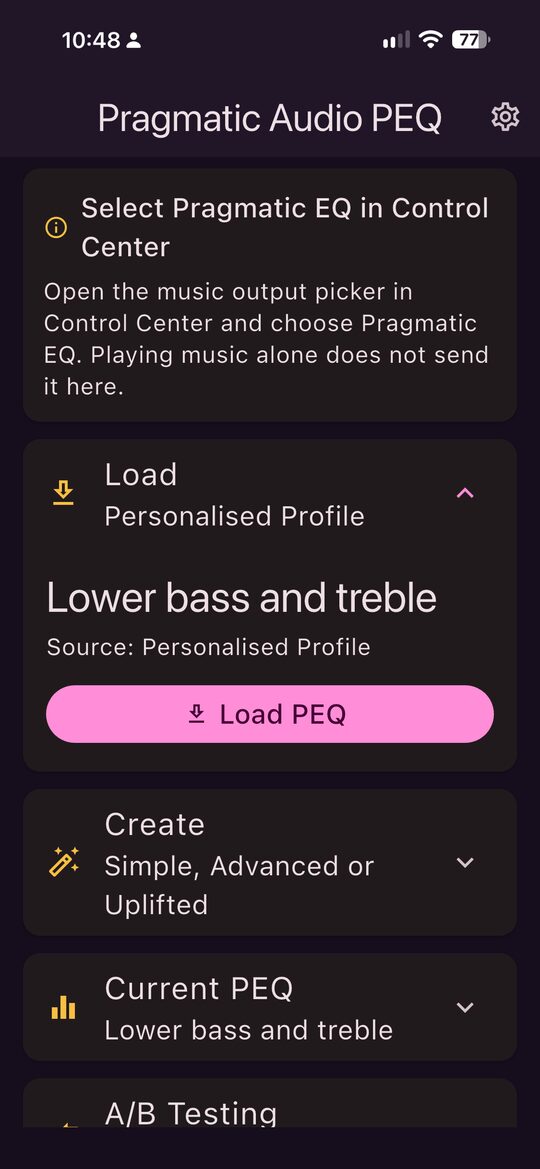 Before the connection is made, the app tells you what to do: open the output picker in Control Center and choose Pragmatic EQ. Playing music alone does not send it here.
Once it is connected, the app is a list of folded sections: Live Audio, Load, Create, Current PEQ, A/B Testing and Effects. Open one and it unfolds; on an iPad the one you open moves to the left pane.
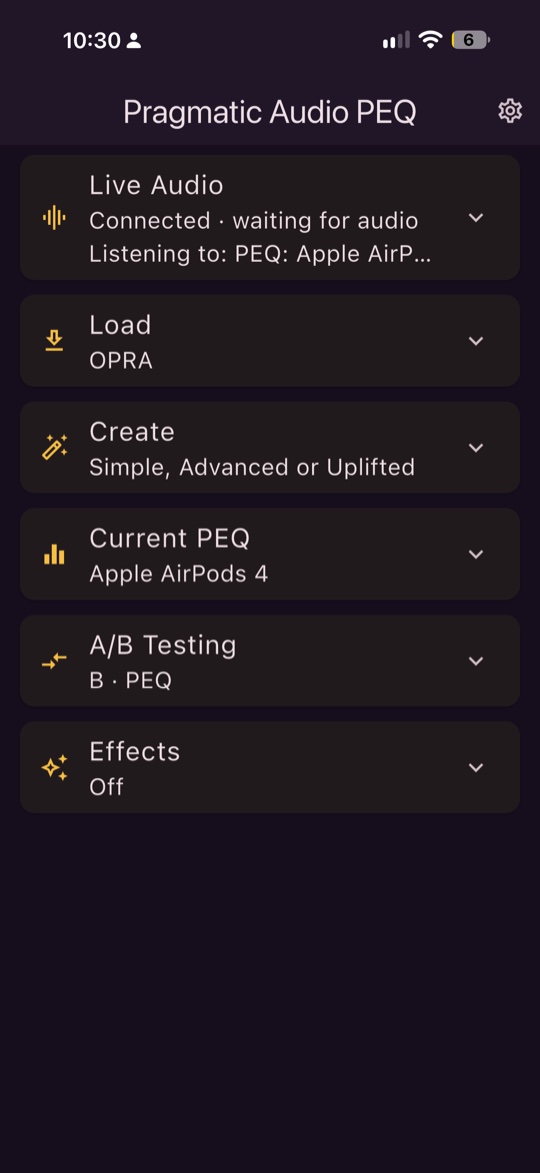 The home screen with every section folded. The Live Audio line says what is on.
Live Audio: what you are hearing, and a way to see it
The listening summary
The top of Live Audio lists everything that is shaping the sound: the loaded PEQ, your bass and treble preference, and each effect that is on. Each item is a chip. Tick a chip to use that thing, untick it to switch it off, and tap the small arrow beside it to go and edit it. If nothing is on, the summary says so and offers three links, load, create and effects, that open those sections.
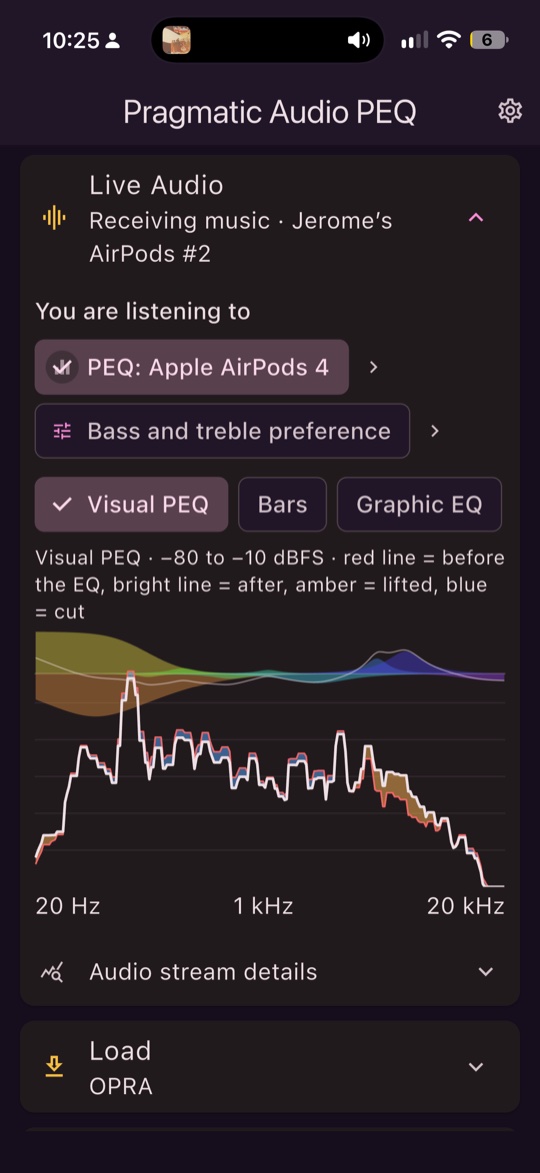 The summary on AirPods: the PEQ is ticked and the bass and treble preference is not. The arrow beside a chip opens where it is edited.
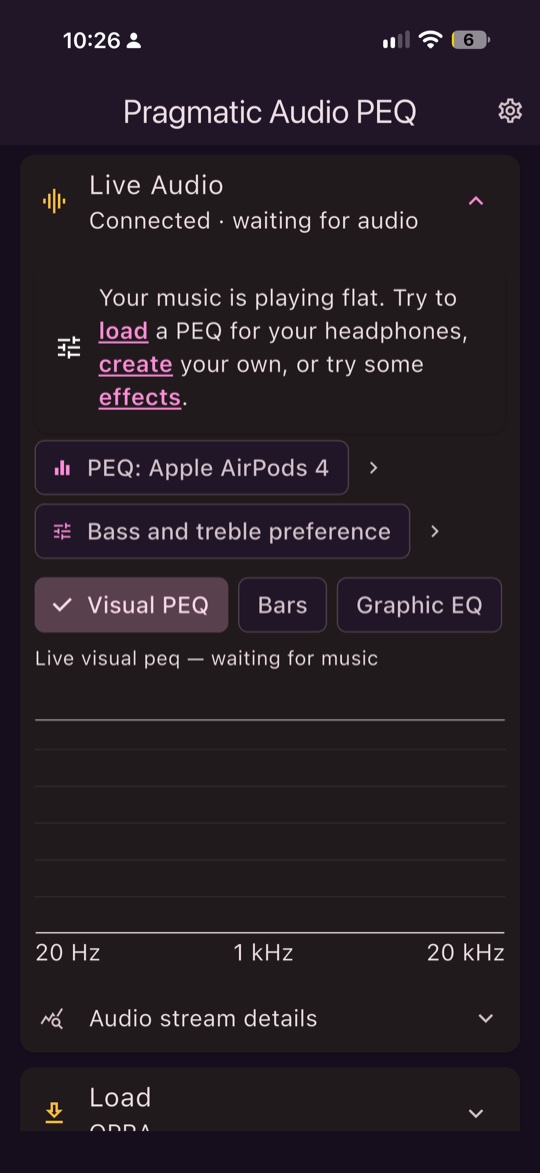 With nothing ticked, the summary says the music is playing flat and links to load, create and effects.
The views
There are eight, chosen from a row of chips, and the one you pick is remembered.
- Visual PEQ (the default): your music as it enters the EQ and as it leaves it, measured over the same instant, with the difference shaded (amber where the EQ lifts, blue where it cuts) and each EQ band drawn. It shows what is actually heard, so your bass and treble preference is included.
- Bars, Graphic EQ (31 third-octave bands, LED style) and Line: spectrum views, with an optional EQ curve overlay.
- Spectrogram: frequency against time, scrolling.
- Meters: left and right peak and RMS, balance and clipping.
- Dual VU: two analogue-style dials with VU ballistics. The face, scale (VU or dBFS), reference level and needle response are in Settings.
- Spiral: the spectrum wound onto a spiral, so the angle is the note and each turn is an octave.
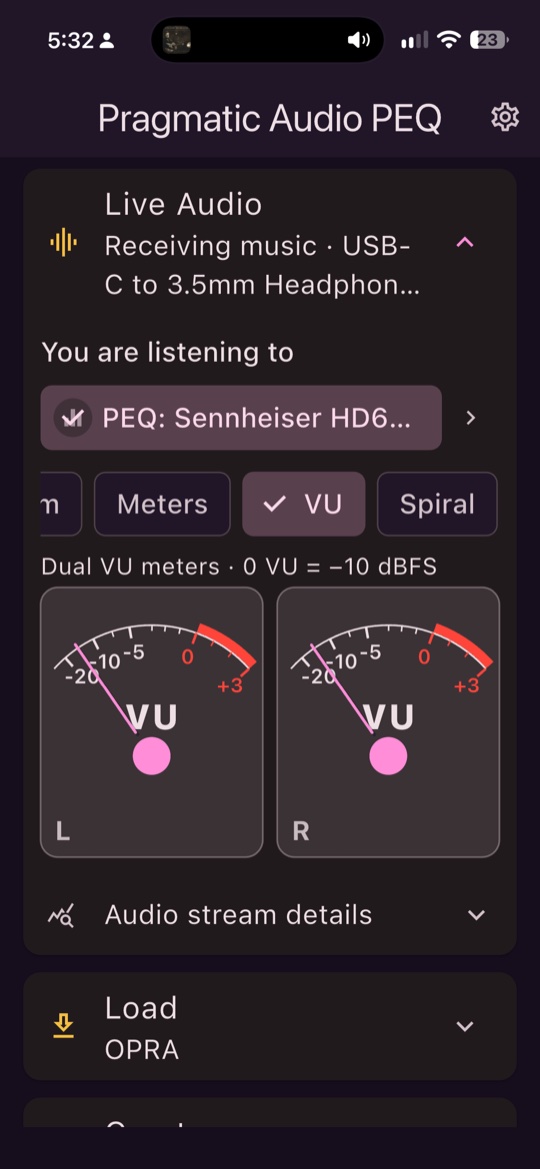 Dual VU meters.
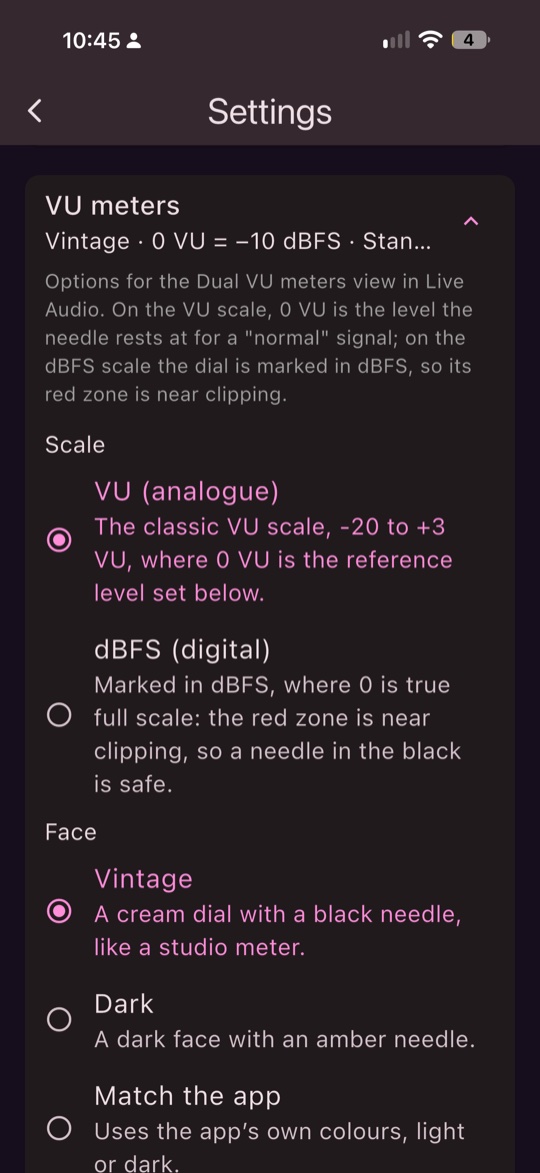 Scale (VU or dBFS), face (Vintage, Dark or matching the app) and the reference level.
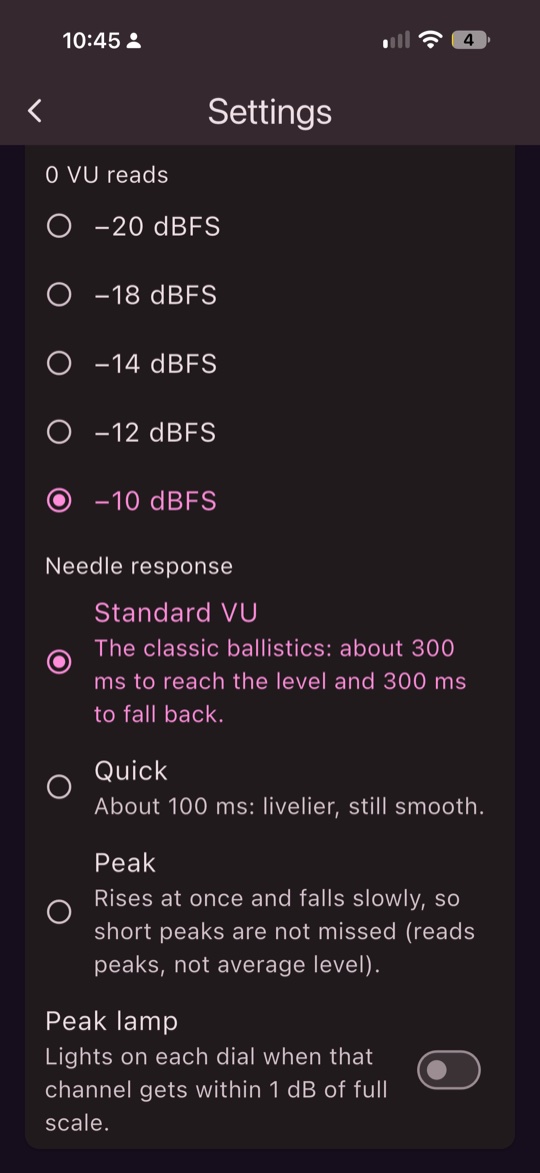 0 VU can sit at -20 to -10 dBFS, with Standard, Quick or Peak needle response and an optional peak lamp.
Settings has a page for the visualisation: the style Live Audio opens with, the EQ-curve overlay, and the update rate.
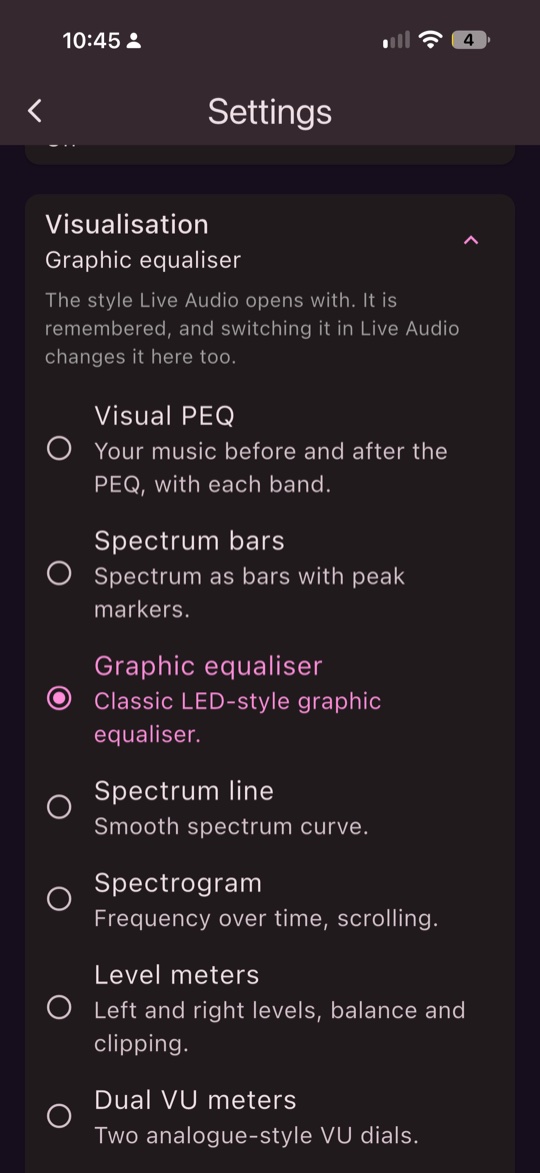 The style is remembered, and switching it in Live Audio changes it here too.
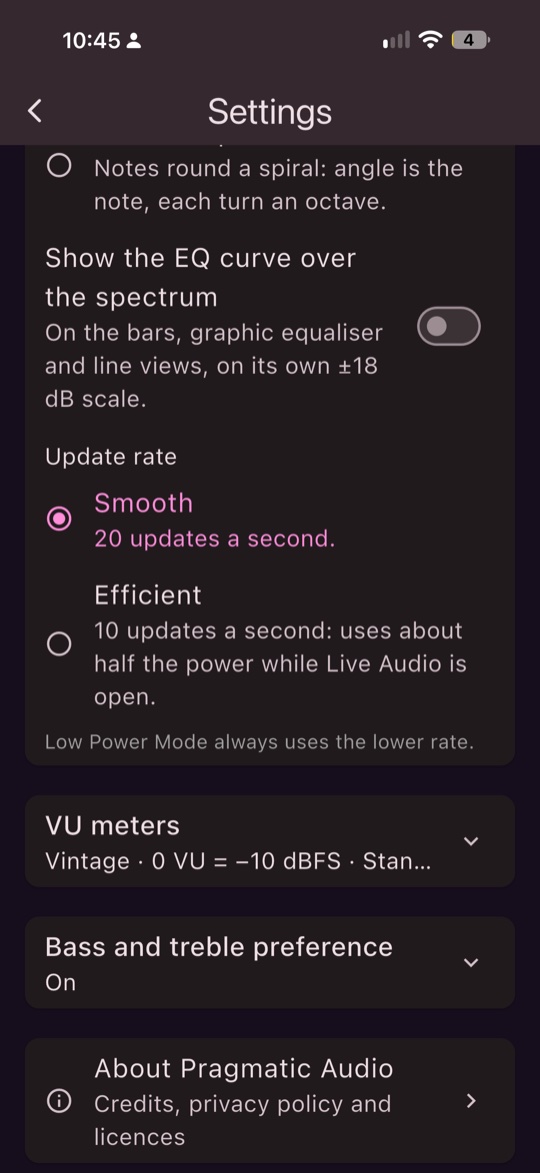 Smooth (20 updates a second) or Efficient (10, about half the power). Low Power Mode always uses the lower rate.
The spiral is the one view that is just for fun. Notes that are an octave apart are the same note, so they sit on the same spoke, one turn further out. A chord shows as a pattern on a few spokes, and a melody walks round the dial. The idea comes from the Chroma Spiral analyser in EffeTune and EffectDeck (both MIT licensed). It is drawn from this app’s own spectrum, not copied from theirs, so the low octaves are coarser than theirs.
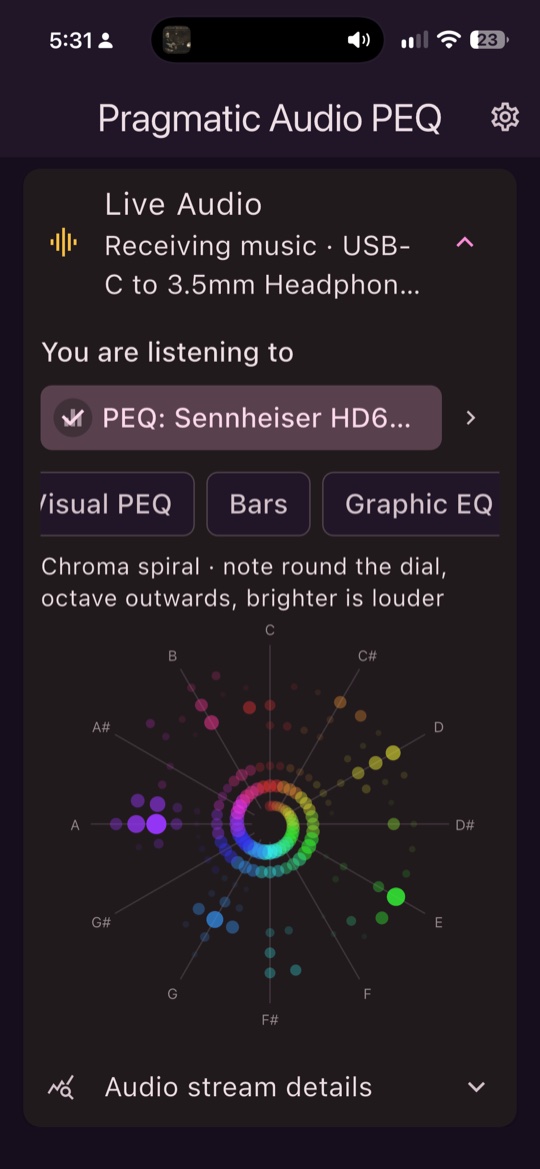 Spiral. Each note sits on its own spoke, C at the top, and each turn outwards is the next octave up.
Live Audio only does its analysis while it is open. Close it and the app does no visual work at all. There is an update-rate setting (Smooth, Efficient) because the cost of live drawing is mostly the screen refresh, not what is drawn.
Audio stream details
Folded under Live Audio: the state of the playback engine, the local PCM listener and the extension, the output route, whether audio is arriving, frame counts, clipped samples and whether the limiter has acted. It also holds the volume hint, covered under headroom below.
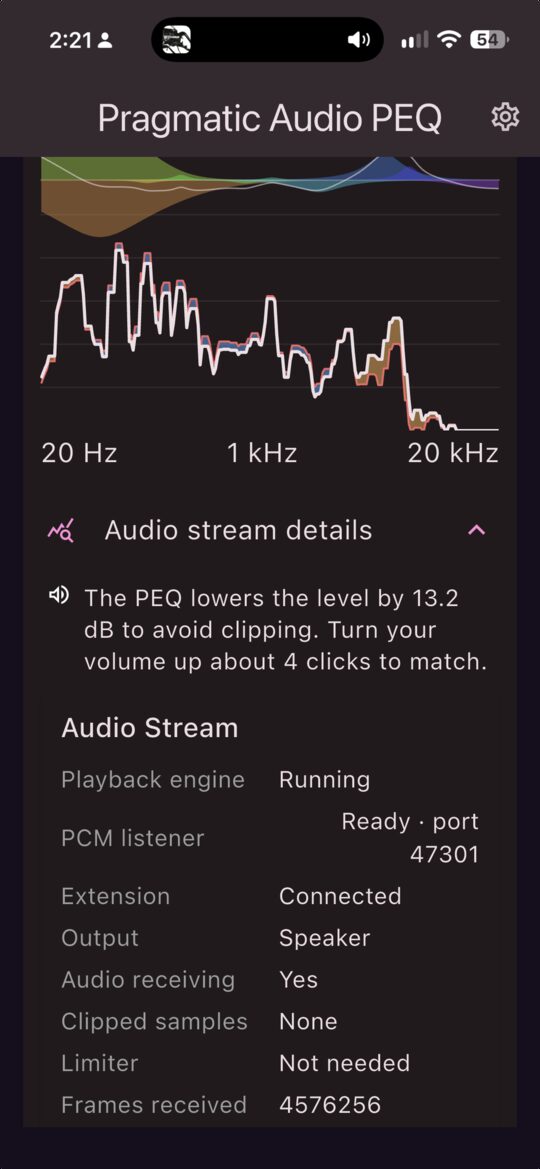 Audio stream details, open under Visual PEQ: the volume hint (“The PEQ lowers the level by 13.2 dB to avoid clipping. Turn your volume up about 4 clicks to match.”), then the playback engine, PCM listener, extension, output, whether audio is arriving, clipped samples, the limiter and frames received.
Loading a PEQ
Tap Load and then Load PEQ. There are three sources, listed in this order.
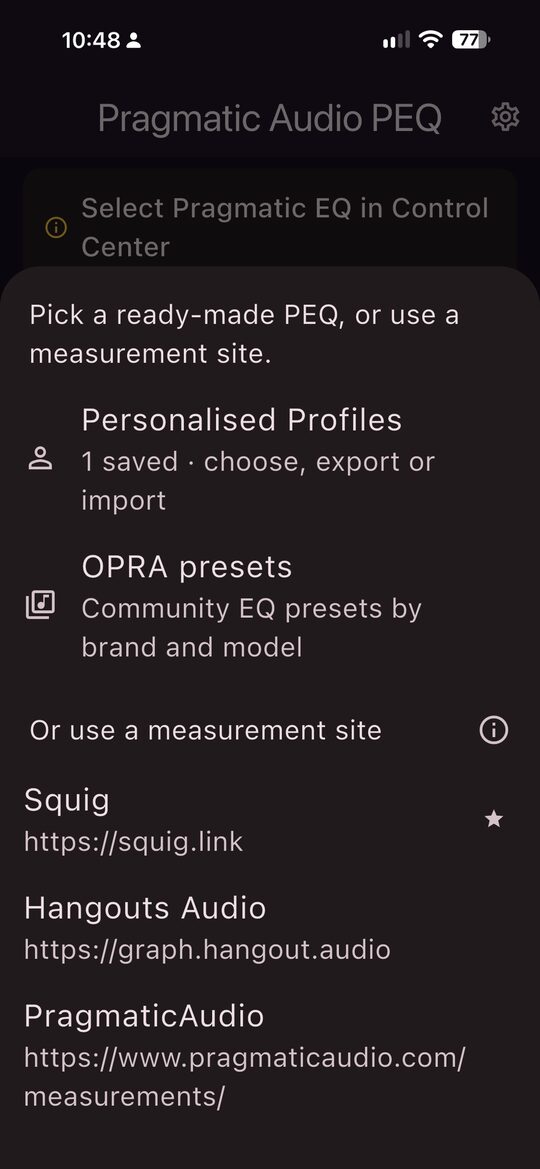 The Load popup: Personalised Profiles (with a count), OPRA presets, then “Or use a measurement site” with the sites below it. The (i) beside it explains how that works.
OPRA presets
OPRA, the Open Profiles for Revealing Audio project started by Roon Labs, is a community database of EQ presets for thousands of headphones and IEMs. Pick a brand, a model, then a preset. Every preset is shown with its creator, and the creator is the most prominent thing on the card, because that is what OPRA’s licence (CC BY-SA 4.0) asks for.
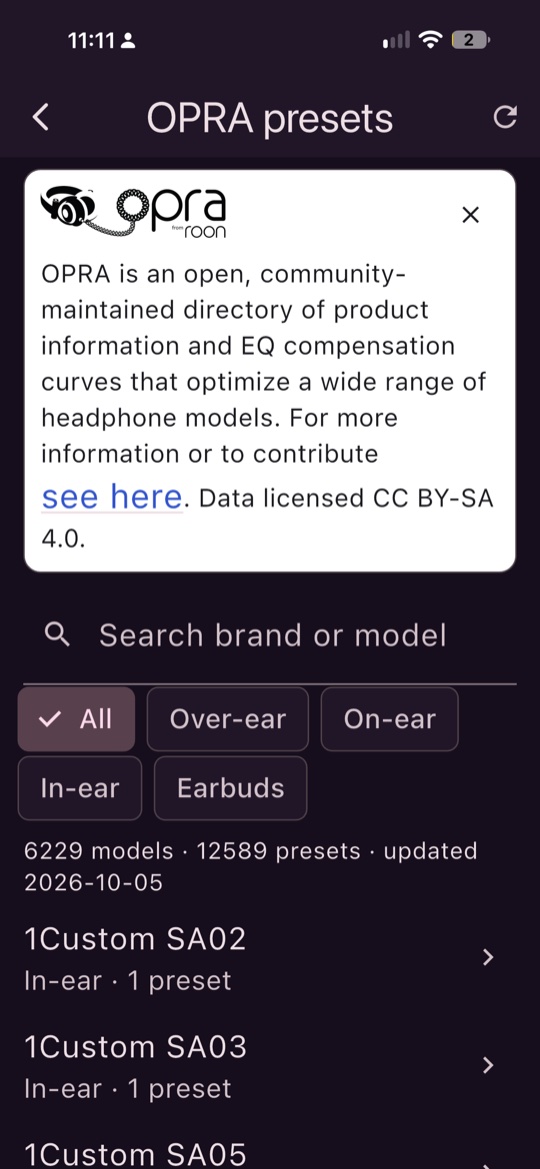 The OPRA browser: 6,229 models and 12,589 presets in the list downloaded on 5 October, with OPRA’s own description and a filter for over-ear, on-ear, in-ear and earbuds.
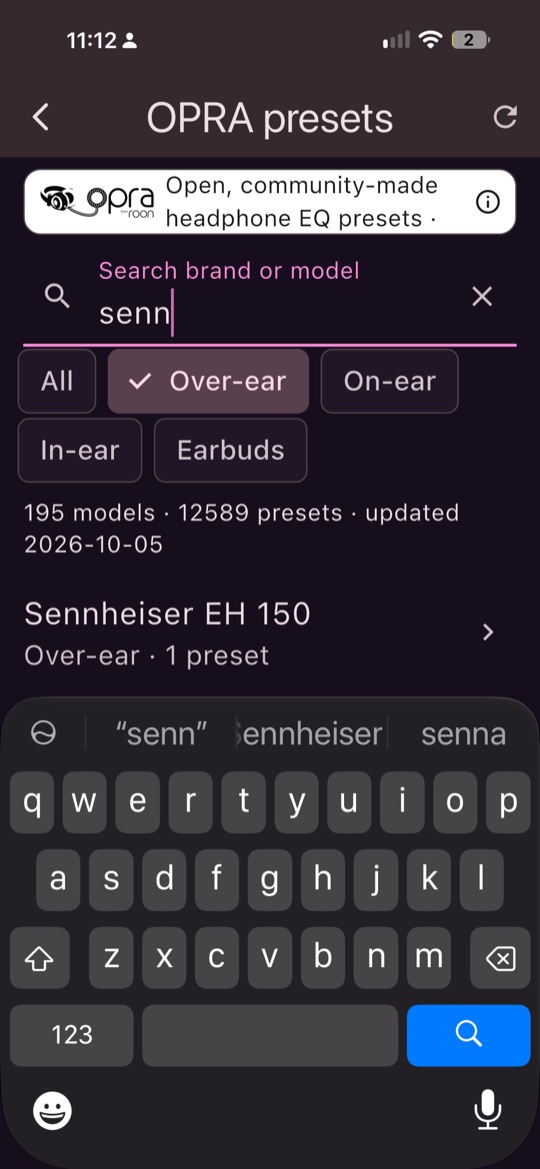 Search by brand or model, here “senn” with over-ear selected.
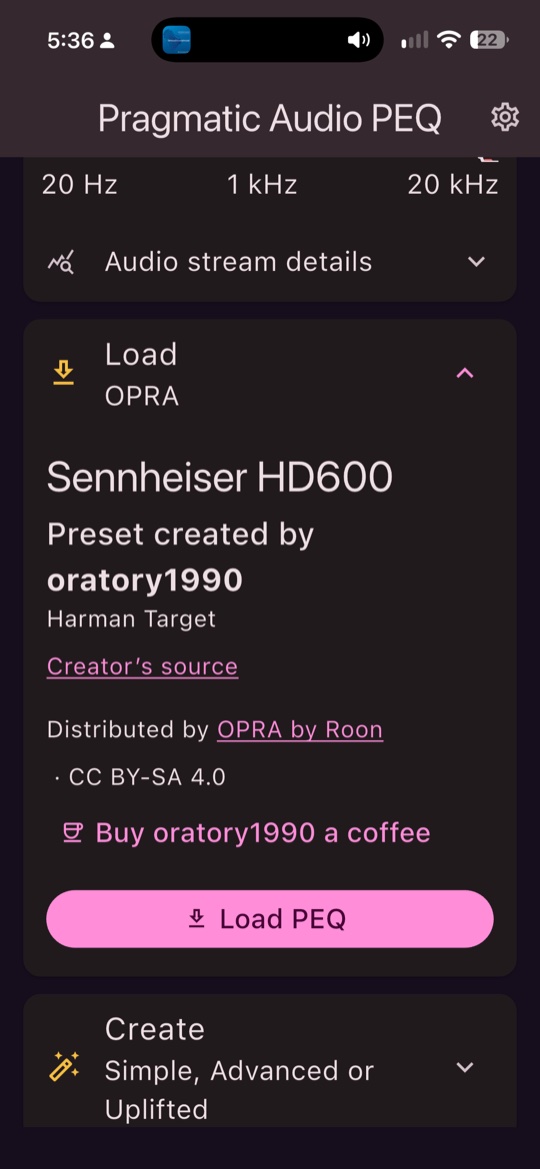 An OPRA preset for the Sennheiser HD 600 by oratory1990, with the creator first, then the source and licence.
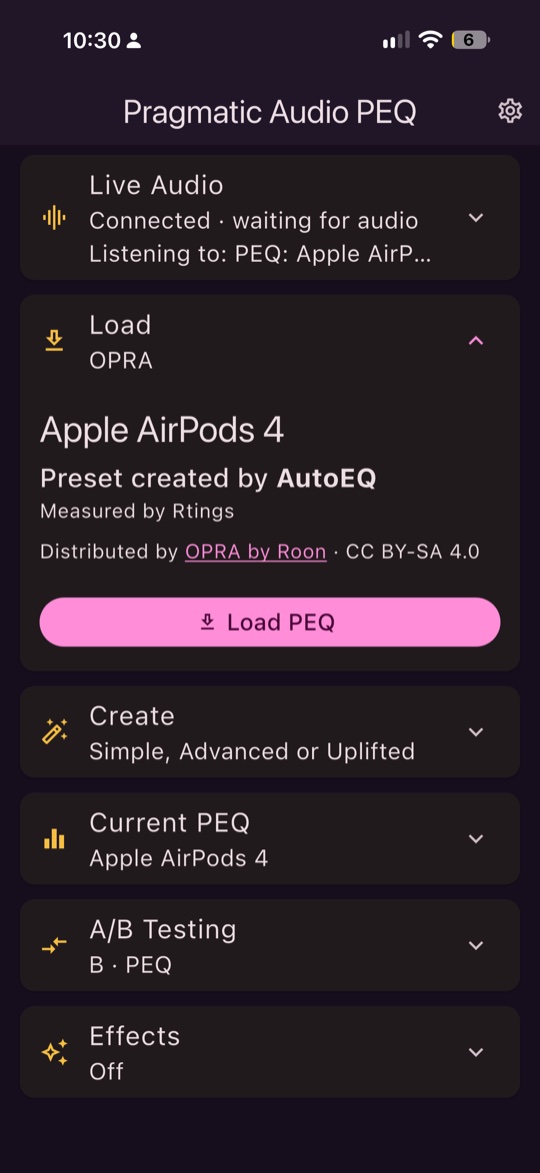 Another preset, for the Apple AirPods 4: created by AutoEQ from Rtings measurements. The creator is always named.
The list (about 1 MB) is downloaded from opra.roonlabs.net when you open Load, refreshed at most once a day, and kept for offline use. Only peaking and shelving filters are supported, so the few presets that use pass filters are left out.
Measurement sites
The other route is the measurement sites: Squig.link, crinacle’s graph.hangout.audio, the PragmaticAudio measurements page, and any URL you add in Settings. Choosing one opens that site inside the app. Pick your headphone, go to the site’s Equaliser tab, design your PEQ (or let AutoEQ do it), then press the site’s Export button. The app catches the exported filters and imports them automatically. You do not download or open a file.
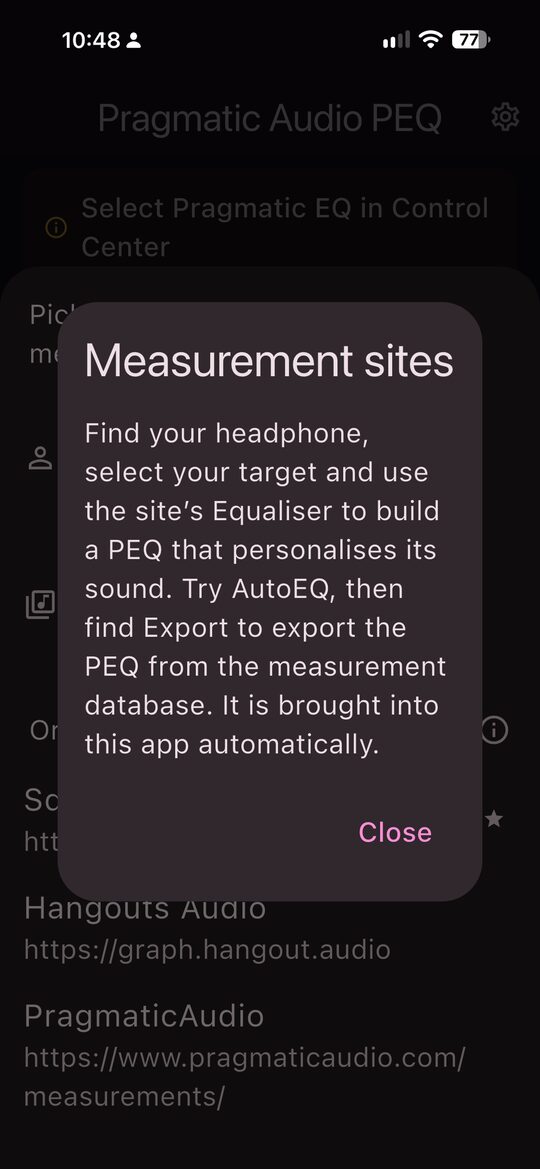 The (i) beside “Or use a measurement site”: find your headphone, choose a target, build a PEQ with the Equaliser, then Export.
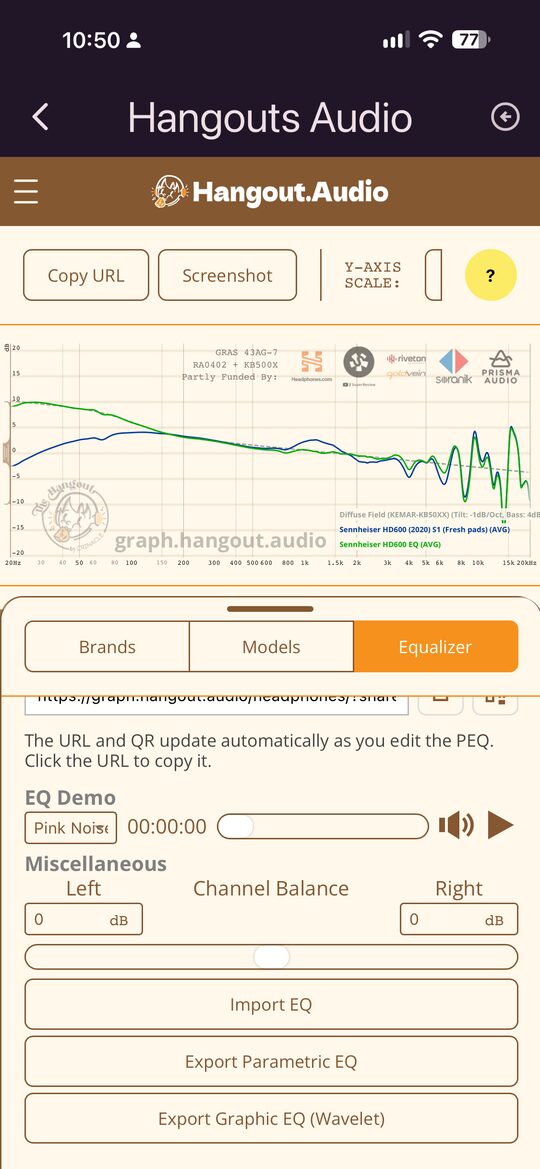 graph.hangout.audio inside the app, on the Equalizer tab with the Export Parametric EQ button. Press it and the filters come straight into the app.
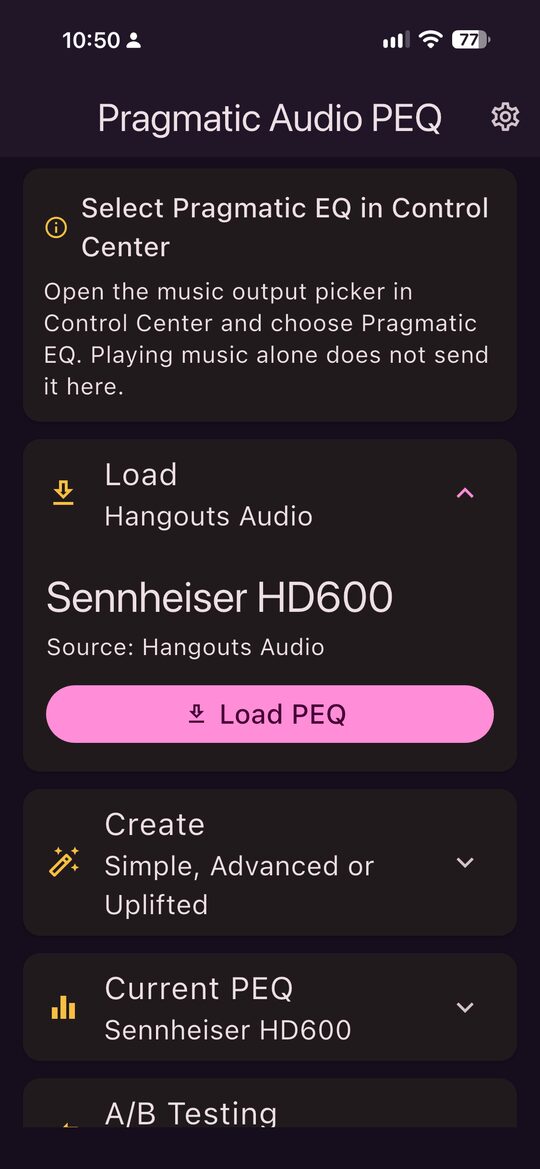 Afterwards the Load card names the PEQ and its source (here the Sennheiser HD600 from Hangouts Audio). It is live straight away, in any app.
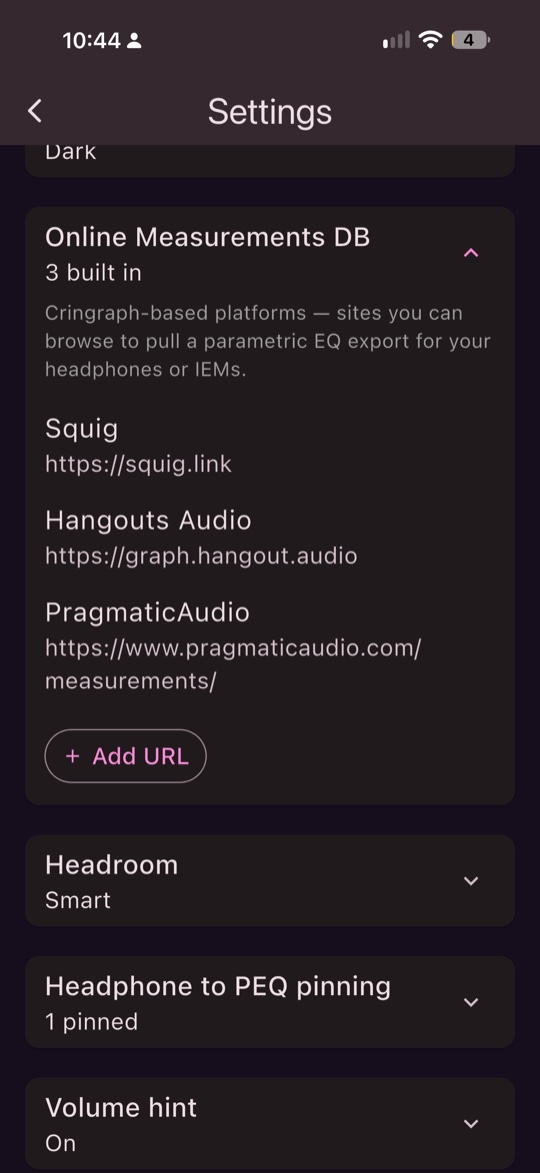 Settings > Online Measurements DB: Squig, Hangouts Audio and the PragmaticAudio measurements page, plus Add URL for any other site.
Personalised Profiles
Your own library: anything you made in Create, saved from the editor, or imported. See Your library, and pinning, below.
The Current PEQ editor
Once a PEQ is loaded it appears under Current PEQ, where you can review and edit it. There is one editor in the app, and every place that edits a PEQ uses it. The changes are live, so you hear them as you make them, in whatever app is playing.
- Tap a dot on the graph to select it. A dotted ring turns round the selected dot.
- Drag the dot to change frequency and gain.
- − and + change the width (Q) of the selected filter.
- Every filter has a row below with its type (peak, low shelf, high shelf), frequency, gain and Q, which you can type into, and a remove button. Add filter makes a peaking filter.
- Each filter’s own effect is drawn in its own colour, with the whole PEQ on top, the same colours Visual PEQ uses.
- The graph takes every touch on it, so the page never scrolls under your finger while you edit. (Scroll beside the graph.)
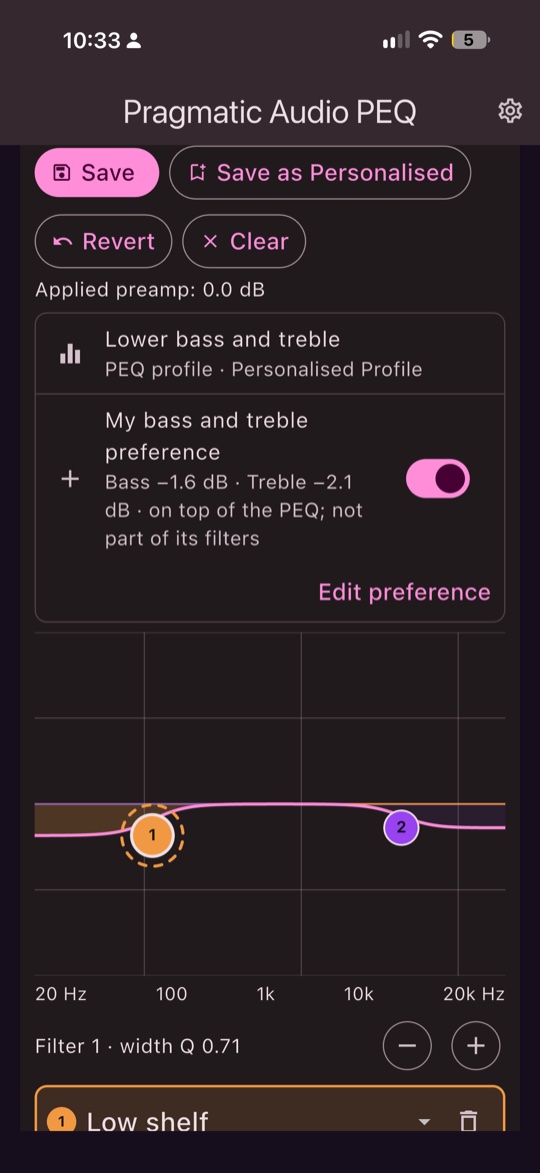 A Personalised Profile in the editor, with the low shelf selected (the dotted ring) and the preference layer above it.
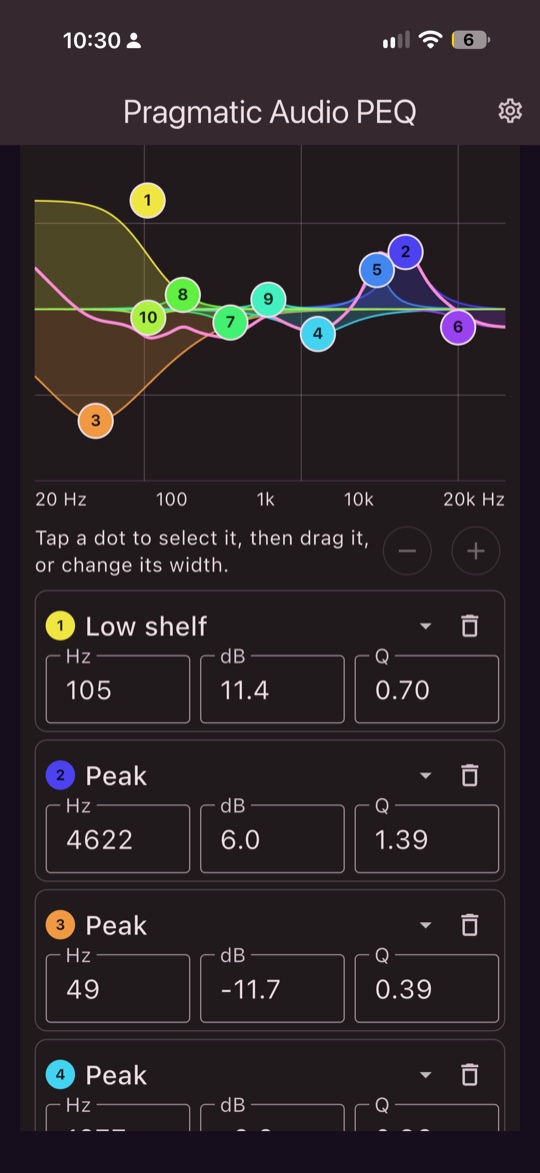 Exact values for every filter, below the graph.
Under the graph: Save (keeps your edits as the saved version), Save as Personalised (names it and keeps it in your library), Revert (back to the last save) and Clear.
Your preference is a layer, not part of the PEQ
If you have made a bass and treble preference (see Create), it appears above the editor as a separate layer on top of the PEQ profile, with its values and an on/off switch. It is deliberately never merged into the PEQ’s own filters: the editor edits the profile only, and Save saves only the profile’s filters. You hear both. You edit them separately.
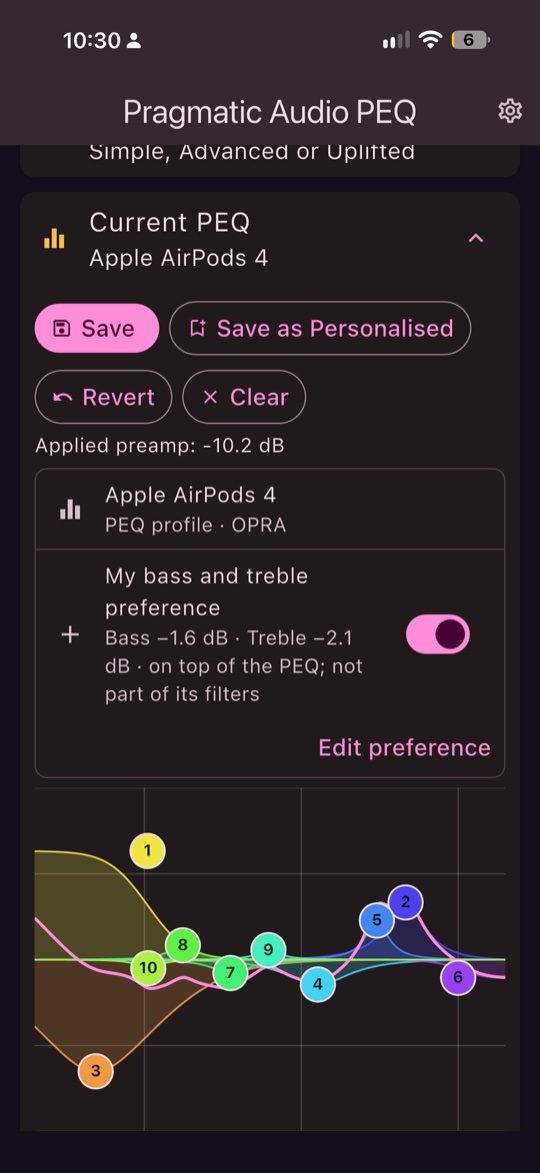 The PEQ profile and, on top of it, your bass and treble preference with its on/off switch and Edit preference. Each filter has its own colour on the graph.
Create
Open Create for three ways to make a PEQ.
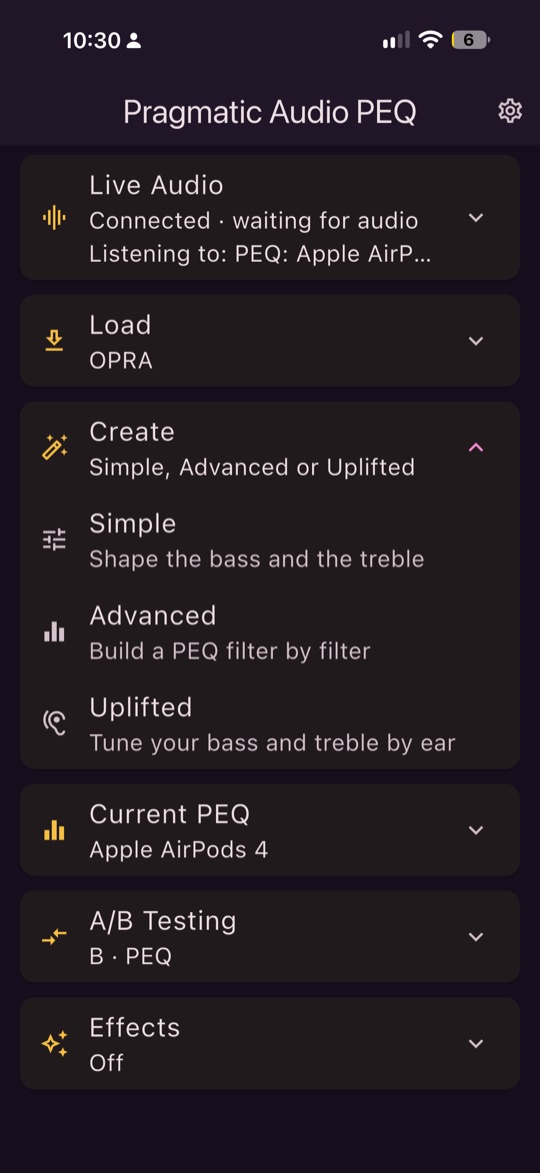 Create offers Simple, Advanced and Uplifting PEQ (labelled Uplifted in the menu).
Simple
A Bass shelf and a Treble shelf, on a flat baseline. Drag each dot up and down for how much, left and right for where it starts, and use − and + for how wide. Every change is heard as you make it. You have four buttons:
- Save PEQ names it and keeps it in your library.
- Save as preference keeps it as your bass and treble preference, applied on top of whatever PEQ is loaded.
- Revert and Cancel.
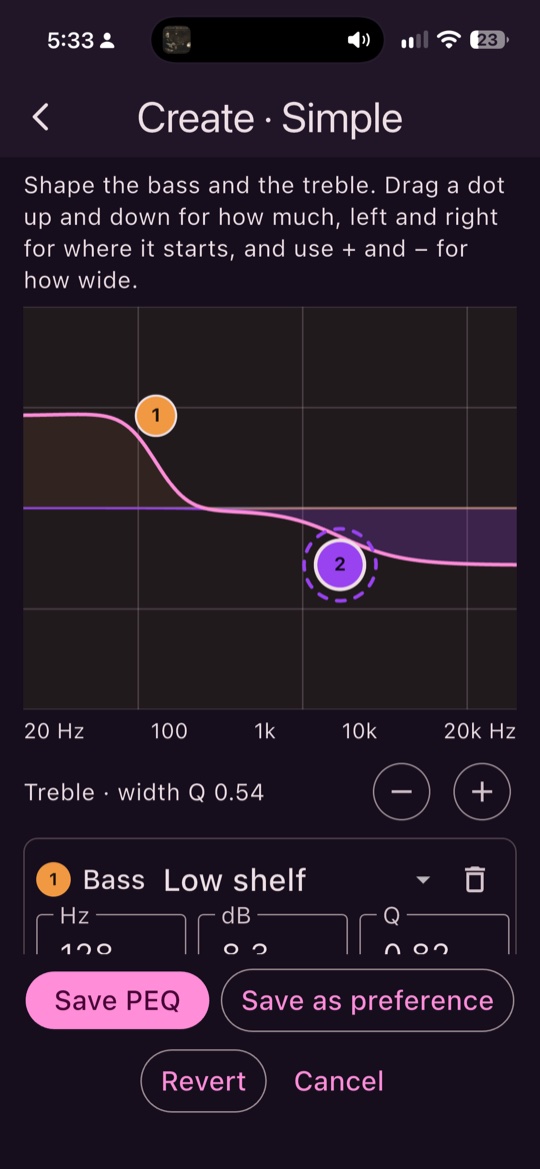 Create > Simple: the Bass and Treble shelves, with Save PEQ, Save as preference, Revert and Cancel.
Once saved as a preference it also appears in Settings, where it can be switched on and off, edited or cleared.
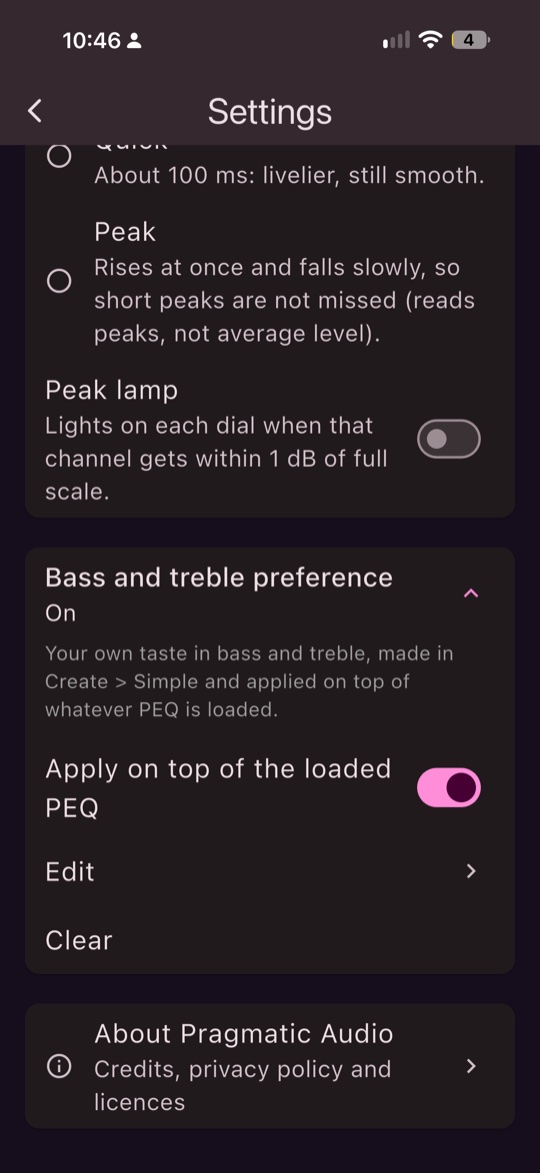 Apply on top of the loaded PEQ, Edit, Clear.
Bass level is a matter of taste that does not change from one headphone to the next, so the preference is set once and applies on top of whichever PEQ you load. You can switch it on and off from the Live Audio summary, from the Current PEQ layers box, or in Settings.
Advanced
The same editor, starting with no filters. Add filters, select them, drag them, type exact values. Save uses it as the current PEQ and Save as Personalised keeps it in your library.
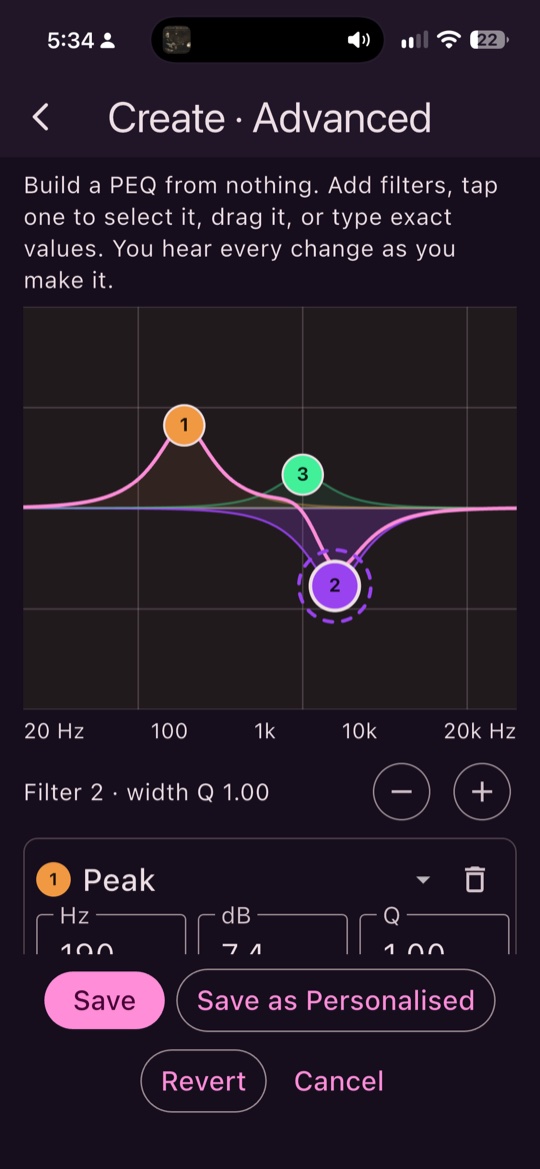 Create > Advanced with three filters; the second is selected.
Starting from nothing, a first filter is a 3 dB peak at 1 kHz that you drag and widen. Save as Personalised asks for a name.
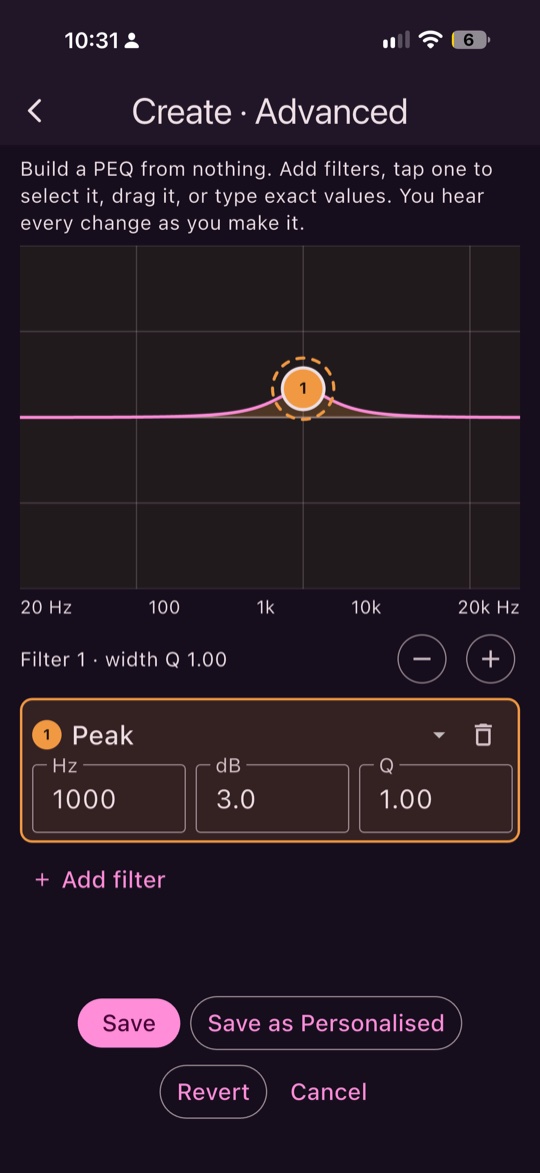 The first filter. Add filter makes the next.
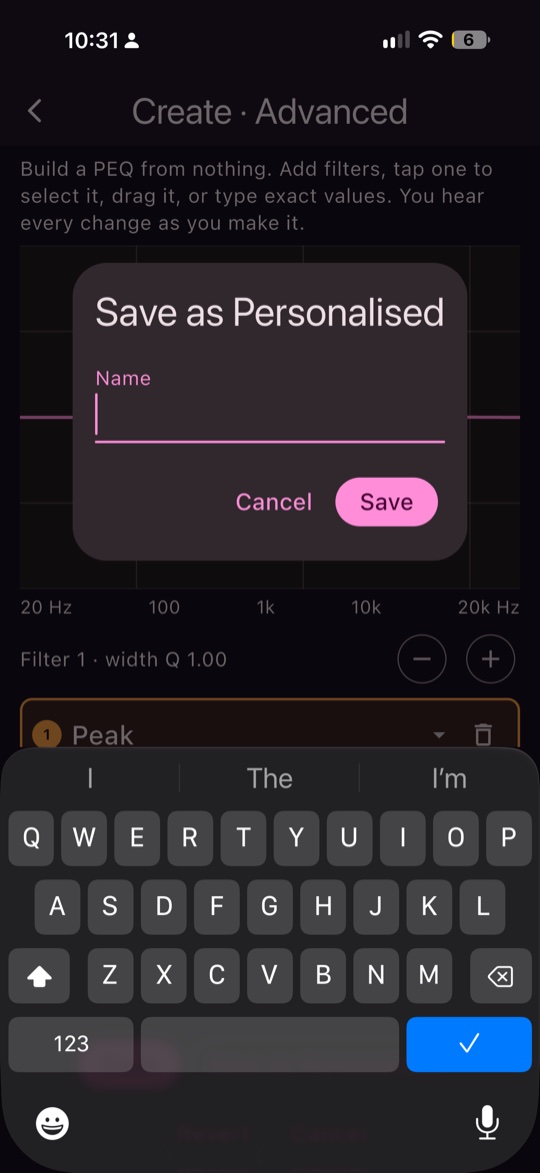 Save as Personalised asks for a name and keeps it in your library.
Uplifting PEQ
Why it exists
A good measurement and a good reference PEQ (oratory1990’s, for instance) get a headphone to a tonally accurate starting point. Two things stay personal.
- Bass is taste. How much you want is yours to set.
- Treble depends on your head and your ears. Ear canal length, the shape of your pinna and how the headphone seats on you all move the treble resonances, by an amount a measurement rig cannot know. This is the same point I made at length in Lifting your headphone experience: a PEQ computed for one measurement point can be precisely right for the rig and slightly off for you.
Uplifting PEQ starts from your loaded PEQ (or none, for a headphone already close to ideal, such as an HD 600 or a HEDD D1), adds your bass and treble preference, and then fine tunes the treble above 4 kHz by ear.
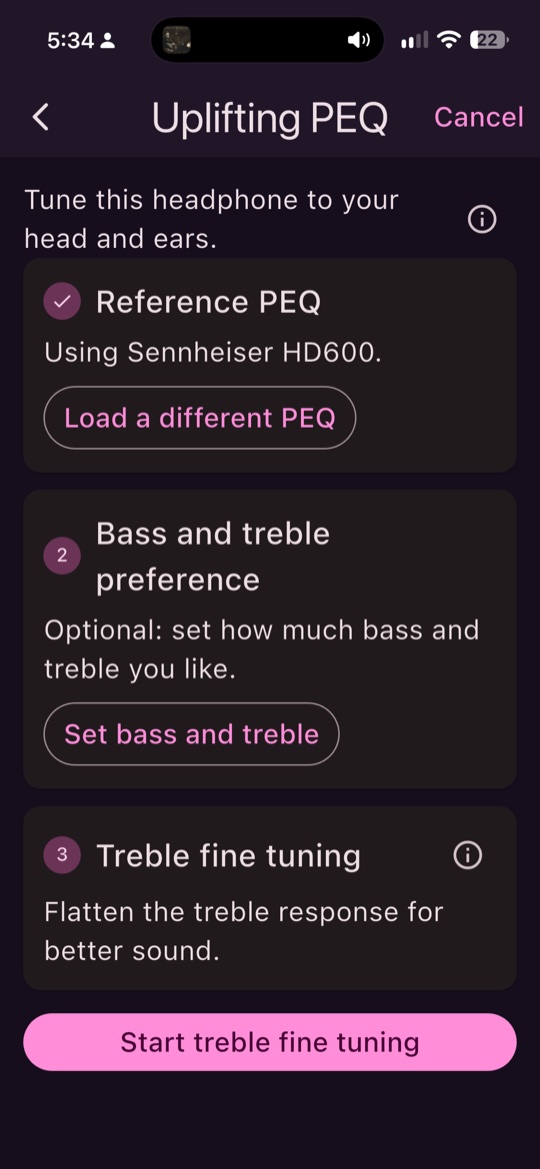 Uplifting PEQ: the reference PEQ, the bass and treble preference, and treble fine tuning, each with its own (i).
When you start the treble fine tuning, the first screen sets the noise level and says what to expect.
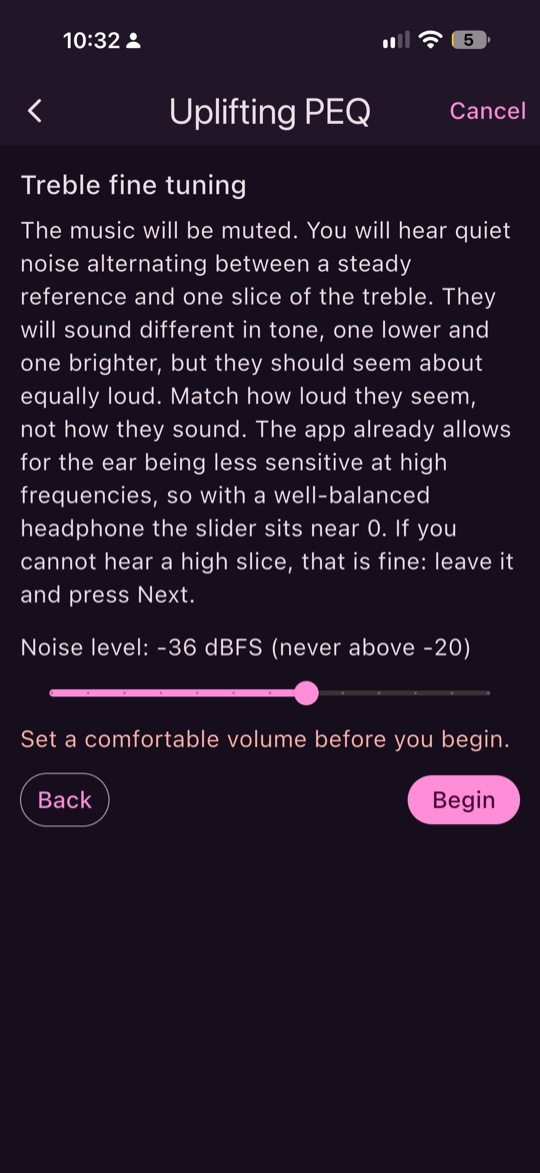 The music will be muted; the noise level defaults to -36 dBFS and is never above -20.
The screen is in three parts. 1, Reference PEQ: the loaded profile, with a button to load a different one. 2, Bass and treble preference: if you have a saved preference it simply uses it, otherwise you can set one here. 3, Treble fine tuning: the listening part.
The listening part
When you start, the music is muted and the app plays quiet pink noise, alternating every two seconds between two things:
- a steady reference, a band of noise around 900 Hz, and
- one slice of the treble.
You move a slider until the slice sounds as loud as the reference. A graph shows both as level bars and highlights the one you are hearing, so you can see the slice rise or fall to meet the reference as you move the slider.
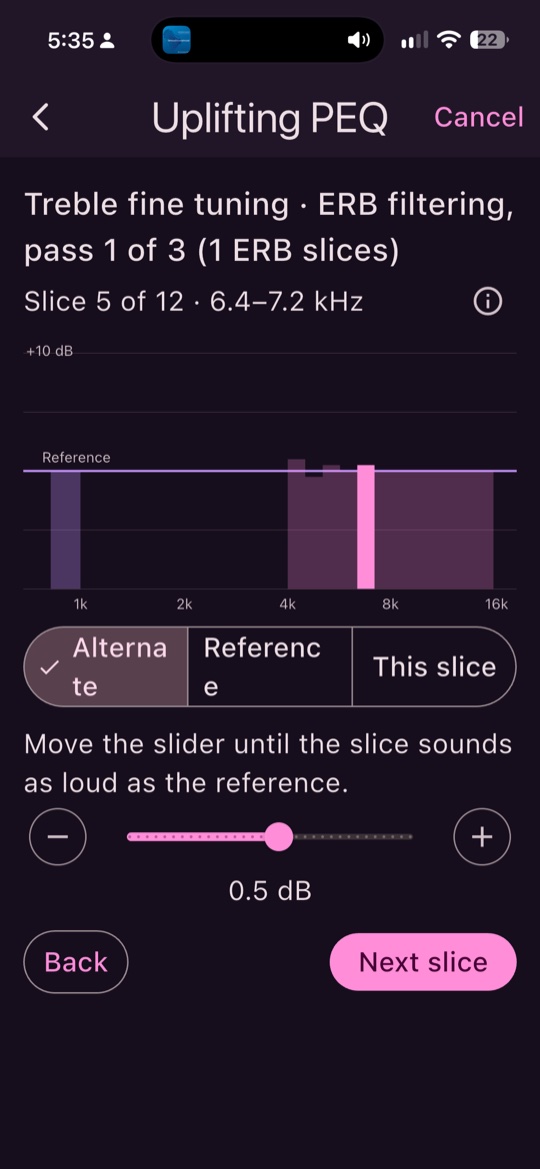 Matching slice 5 of 12 (6.4 to 7.2 kHz). The reference is the fixed bar at 900 Hz, the slice is the bright bar, and the slider sets how far it sits from the reference.
Why slices of a particular width. The slices are one ERB wide. ERB, the equivalent rectangular bandwidth, is
the width of the ear’s own auditory filter, and it is not a fixed number of hertz. It follows
24.7 × (4.37 f / 1000 + 1) Hz (Glasberg and Moore, 1990), so the slices get wider as you go up: about 500 Hz at 4 kHz,
900 Hz at 8 kHz and 1.7 kHz at 16 kHz. From 4 to 16 kHz that is 12 slices. A band no wider than the ear’s own filter is
about as loud as a tone of the same level at its centre (Hots, Rennies and Verhey, 2014), which is what makes
loudness matching of a slice meaningful.
Why the two sound different but should seem equally loud. One is low in the spectrum and the other is bright. You are not matching tone, you are matching how loud they seem. And the ear is not equally sensitive everywhere: it is most sensitive around 3 to 4 kHz and much less so towards 10 kHz. Equal-level noise would not sound equally loud. So the app compensates, using the ISO 226:2003 equal-loudness contours. At about 60 phon, a band at 8 kHz needs roughly 12 dB more level than the reference to seem as loud, and one at 4 kHz about 2 dB less. The app plays the slice that much above or below the reference and shows a note saying so. The reference is turned down to make room rather than the slice turned up, so nothing is ever louder than the level you chose. That is why the reference sounds quieter in the high slices. It is intended.
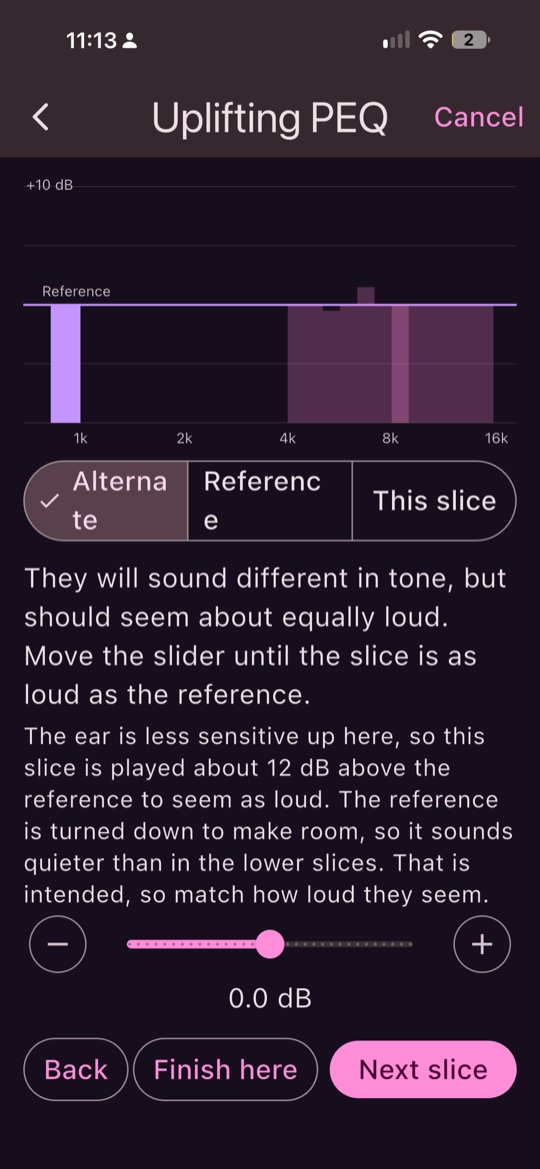 A slice around 8 kHz in pass 1. The note says it is played about 12 dB above the reference, and the reference bar is turned down to make room. Finish here appears from about 8 kHz.
With a balanced headphone, equal-sounding slices then leave the slider near zero. What you move it by is what is different.
A slice you cannot hear. Hearing fades at the top with age, and everyone’s is different. If you cannot hear a slice in the highest treble, leave it at 0 dB and press Next. A slice you cannot hear gets no correction. From about 8 kHz up there is also a Finish here button, so you can stop early.
Passes
Pass 1 uses 1 ERB slices. Then you can fine tune with 1/2 ERB slices and then 1/4 ERB slices, but a finer pass only revisits the slices where the earlier pass changed something. Where the first pass found nothing, there is nothing to look at more closely. In those later passes the sound already has the earlier filters on, so what you match is the correction still needed, and each slider starts where the first pass left it, so leaving a slice alone means “no change”.
After every pass the app refits all the treble filters from scratch to the running total of your choices. It picks among the widths you have heard so far, so a broad lift with a narrower dip inside it comes out as the net shape, not as two filters left to cancel. The caps are six treble filters after pass 1, ten after pass 2 and fourteen after pass 3, each limited to 12 dB. If you do a finer pass and change nothing, the filters stay exactly as they were.
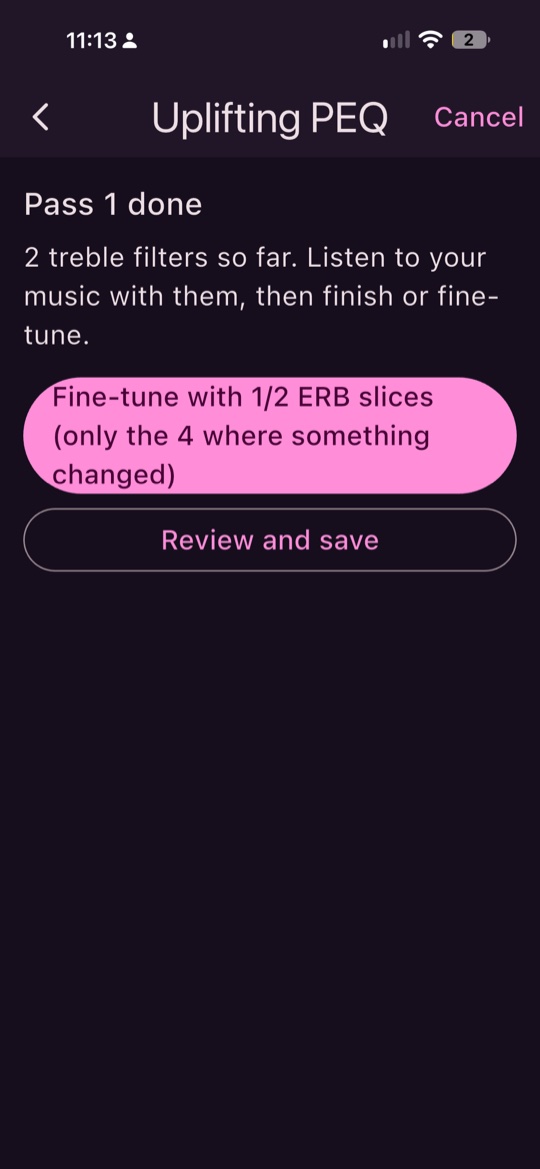 After pass 1: two treble filters so far, and an offer to fine tune with 1/2 ERB slices, only the four where something changed.
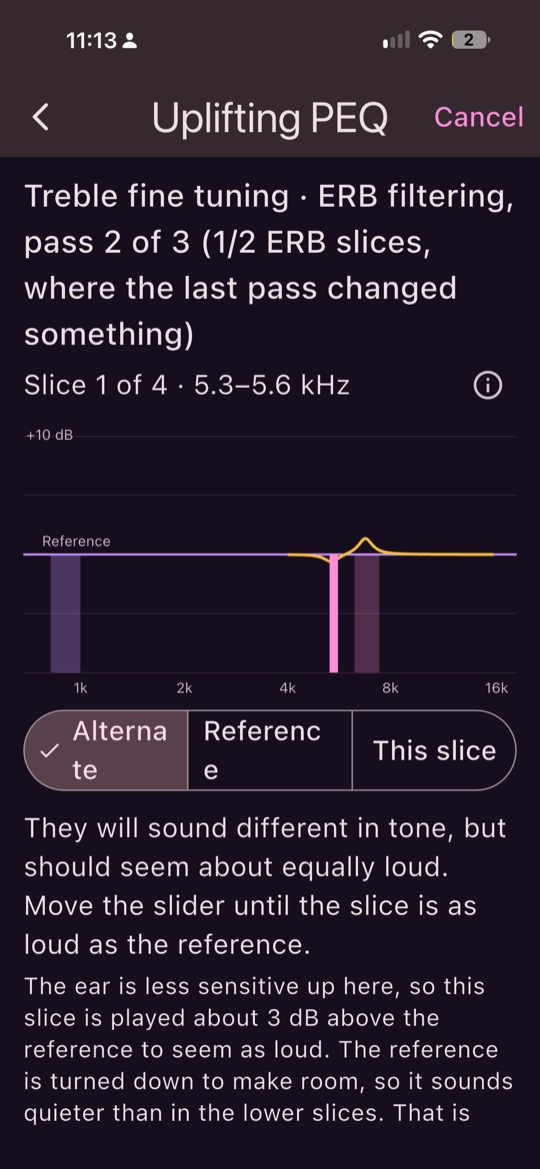 Pass 2 of 3, slice 1 of 4 (5.3 to 5.6 kHz). The yellow line is the correction fitted so far, and the sound already has it on.
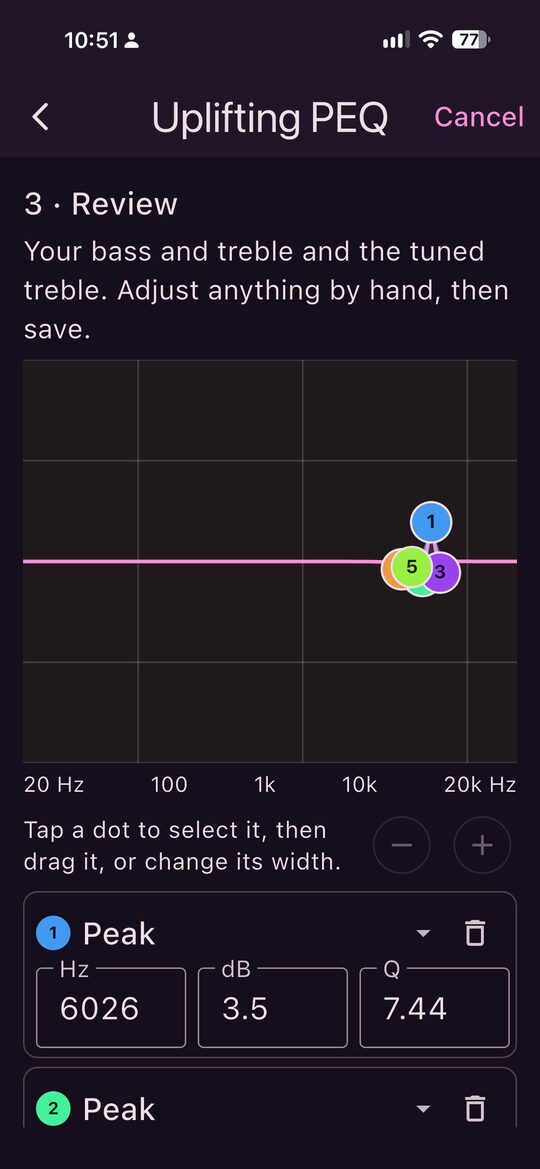 Step 3, Review: the fitted filters appear in the same editor, numbered, and can be adjusted by hand before you save. Here they sit close together near 6 kHz.
What it saves
One Personalised Profile, named for your headphone (for example “HD 600 · Uplifted”), made of the loaded PEQ’s own filters, your bass and treble shelves if you set them in this session (a saved preference is not copied in; it keeps applying on top) and the treble filters. You cannot reopen a session and carry on; load the profile and run Uplifting again, and it starts from there.
What it is not
Uplifting is a listening aid, not a calibrated measurement.
- ISO 226 describes pure tones in a free field and assumes a listening level of about 60 phon, which the app cannot know. Headphones are not a free field.
- Judging loudness across a wide gap in frequency (900 Hz against 10 kHz) is harder than comparing neighbours, and your choices will scatter by a few dB. That is why the result is a few smooth filters, limited to 12 dB, with the overall tilt left to your Treble shelf. (The ear’s own falling sensitivity would otherwise tilt the top octave by many dB.)
- The ERB formula was derived for 100 Hz to 10 kHz at moderate levels, so the top of the range is an extrapolation, and the ISO 226 table stops at 12.5 kHz.
- The method has not been validated against measurements on a panel of listeners.
The app says all of this in its own (i) text and lists the references. The blind A/B test, below, is a way to check the result.
The method descends from the treble tuning in my Lift project and in DevicePEQ’s treblizer, which matched four broad bands against a mid-frequency reference by ear. The new parts are the ERB-spaced slices, the loudness compensation, and the refinement passes that only revisit what changed.
Your library, and pinning
Load > Personalised Profiles is your library: every PEQ you made, edited or imported. Tap one to use it, None to stop using a personalised profile, or use the menu beside it.
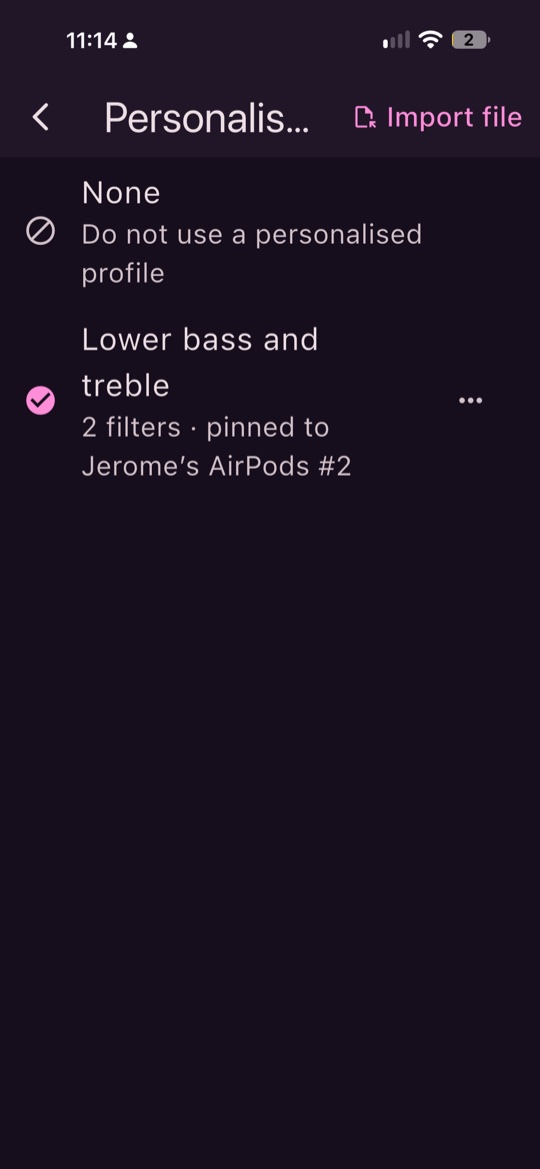 The library: None, and a profile with its filter count and the headphones it is pinned to. The tick shows the one in use; Import file is top right.
- Export as Filters.txt: a standard Filters.txt (Equalizer APO, AutoEQ and the measurement sites read it), through the share sheet, so you can save it to Files or AirDrop it. The preamp in the file is the headroom this app would apply, so it does not clip anywhere else.
- Import file (top right) brings a Filters.txt in. A file that is not a PEQ is refused with a message.
- Save as Personalised from the editor keeps an edited third-party PEQ with its credit intact. Edit an OPRA preset, save it, and its credit stays with it.
- Delete asks first.
Pinning a profile to your headphones
With your headphones connected, open the menu beside a profile and choose Pin to (the name is the audio route iOS reports, for example “AirPods Pro”). From then on, when those headphones connect, that profile loads by itself and the app says so. It acts only when the device changes, so a PEQ you pick by hand afterwards is left alone until the headphones connect again. Settings > Headphone to PEQ pinning lists every pin and removes them.
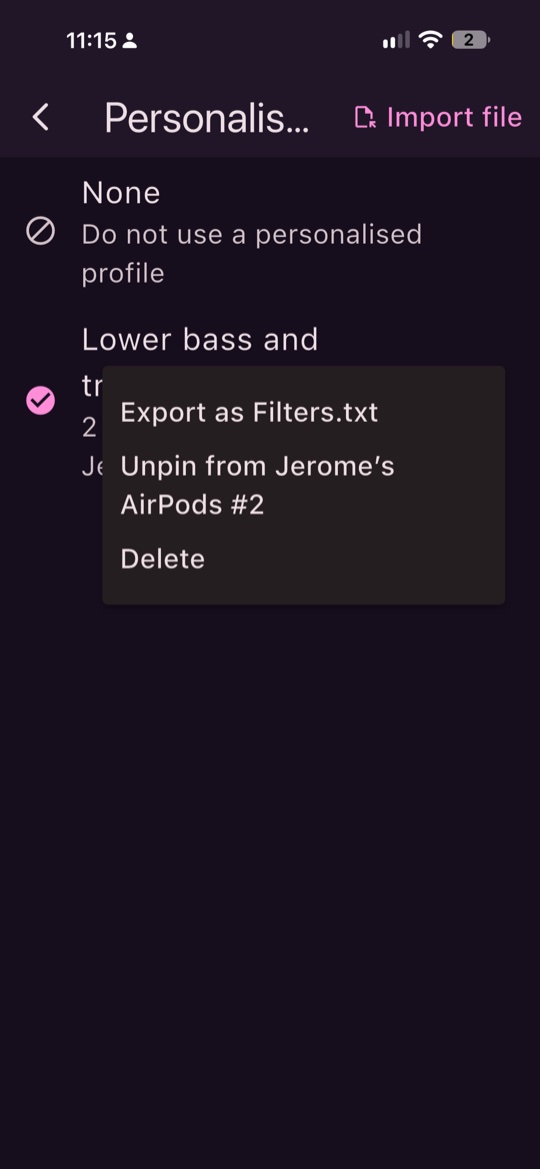 The profile menu: Export as Filters.txt, Pin (here Unpin, because it is pinned to these AirPods) and Delete.
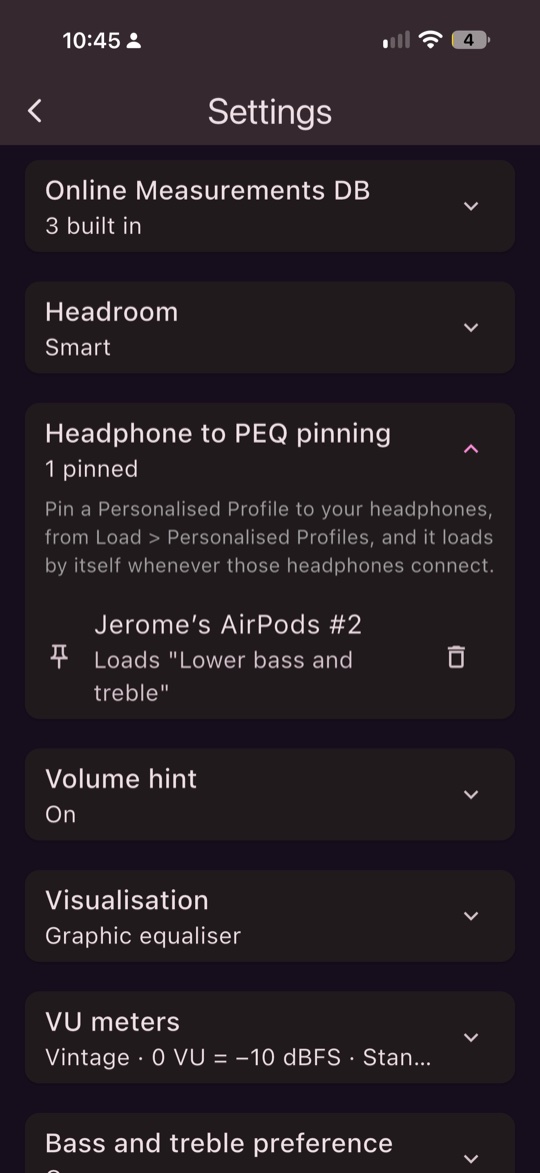 Settings > Headphone to PEQ pinning: the AirPods and the profile that loads when they connect, with a remove button.
A/B testing, and a blind test
A/B Testing switches between No PEQ and PEQ while the music plays, with a manual gain slider for matching the volume by hand and a Volume-matched A/B option, because the louder of two things usually sounds better. Use it for what it is good for: a quick sighted comparison.
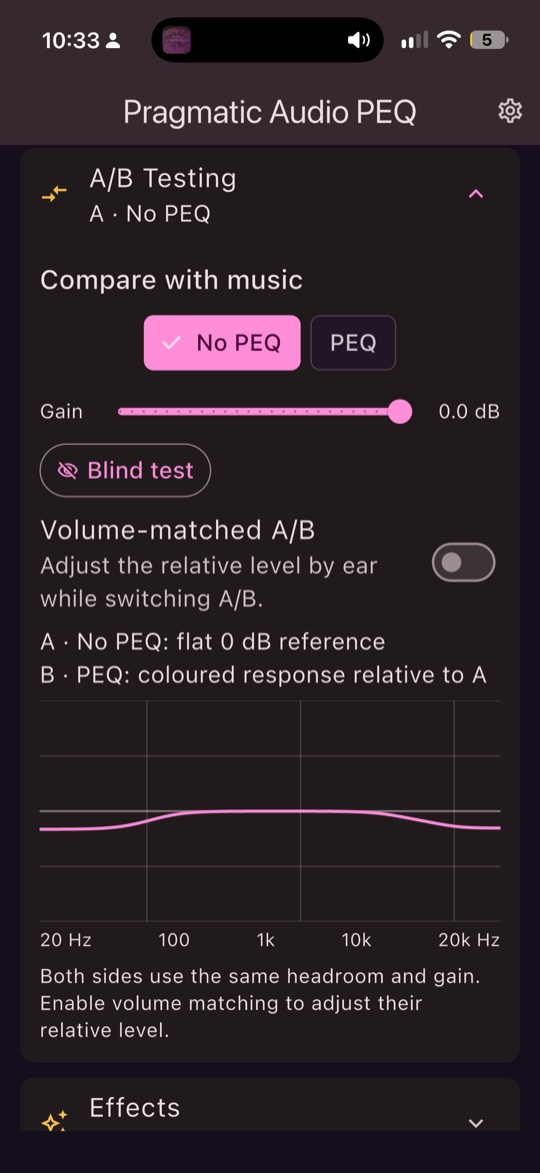 A/B Testing: No PEQ and PEQ, the gain slider, the Blind test button, Volume-matched A/B and the graph of the difference.
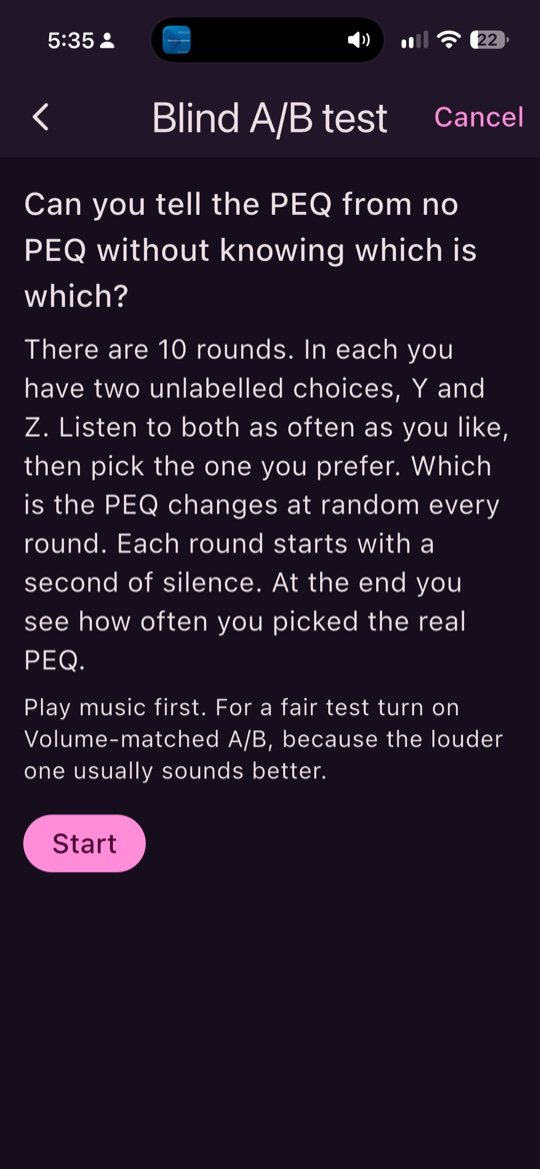 The blind test explains itself before it starts.
For a fair comparison there is a Blind test. It plays two unlabelled choices, Y and Z, which are the PEQ and no PEQ in a random order that changes every round. Each round starts with a second of silence, you can switch between Y and Z as often as you like, then you pick the one you prefer. There are ten rounds, and half of them have the PEQ as Y, so always choosing Y cannot look like a preference.
At the end it shows a table (what Y was, what you picked, what that was) and how many times you picked the real PEQ, with an exact binomial test: how likely that many picks of one side would be by guessing. Nine of ten is about a 2% chance by guessing, so unlikely to be chance. Eight of ten is about 11%, which is not enough to say. Anything near five means you could not reliably tell them apart blind, or that the difference is small once the level is matched.
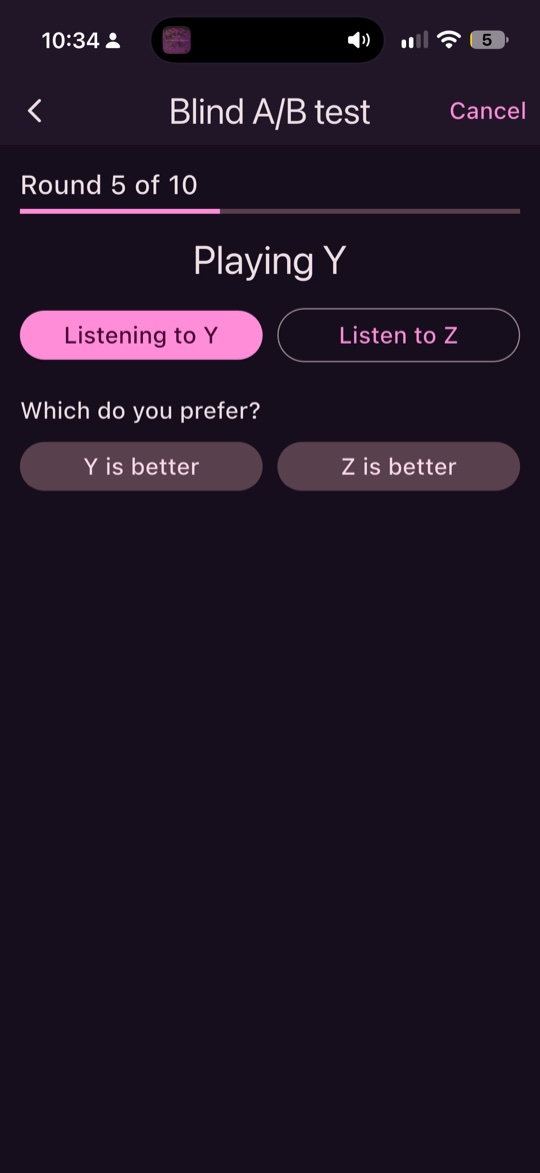 Round 5 of 10. Nothing says which one is the PEQ.
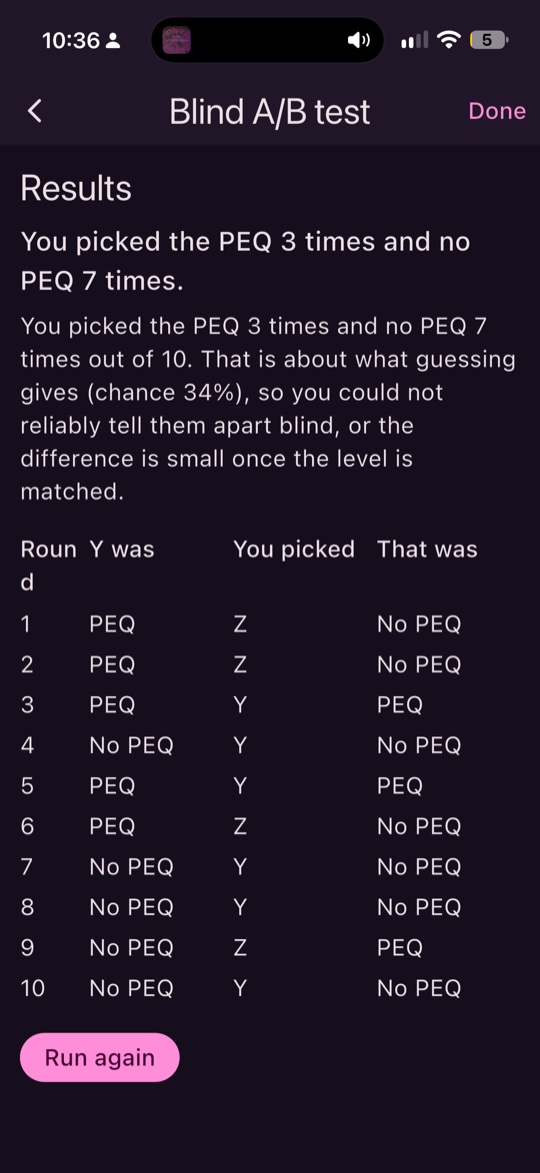 Results: 3 picks of the PEQ and 7 of no PEQ, with the table that shows which was which. That is about what guessing gives (a 34% chance), so no reliable difference.
Turn on Volume-matched A/B before you start. Without it the louder side wins more often than it should, which tells you about volume, not about the PEQ.
Effects
Three effects, in one Effects section below A/B Testing. Each can be switched on from the Live Audio summary.
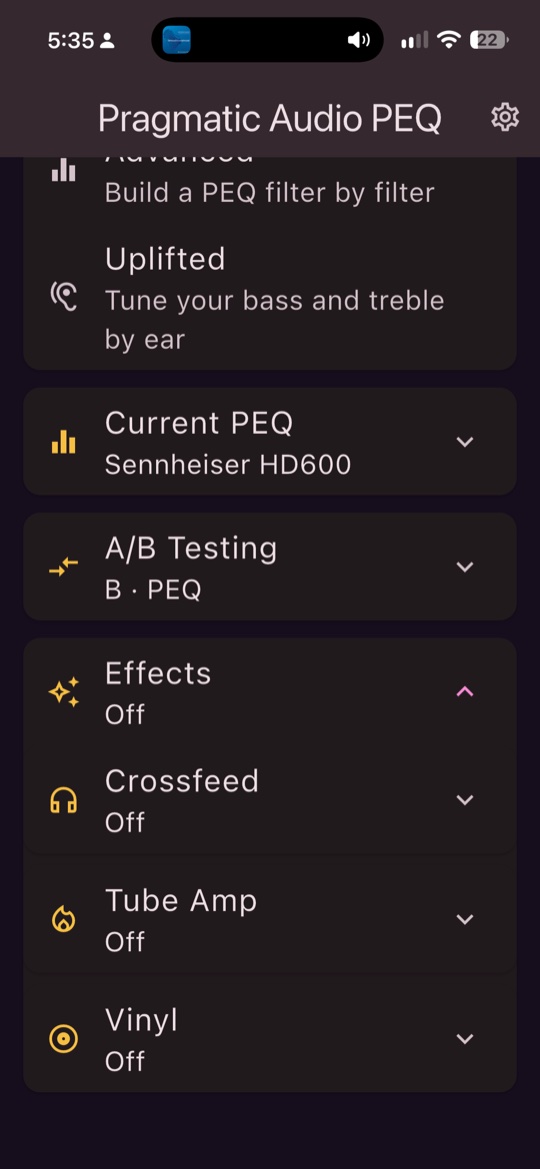 The Effects section, with Crossfeed, Tube Amp and Vinyl each folded and Off.
Crossfeed
Blends a little of each channel into the other, with a small delay and a low-pass, the way speakers do, to soften the hard left and right of headphone listening. The design follows EffeTune’s Crossfeed Filter (MIT). Crossfeed can raise a perfectly centred signal by up to 3 dB, and the headroom calculation allows for that.
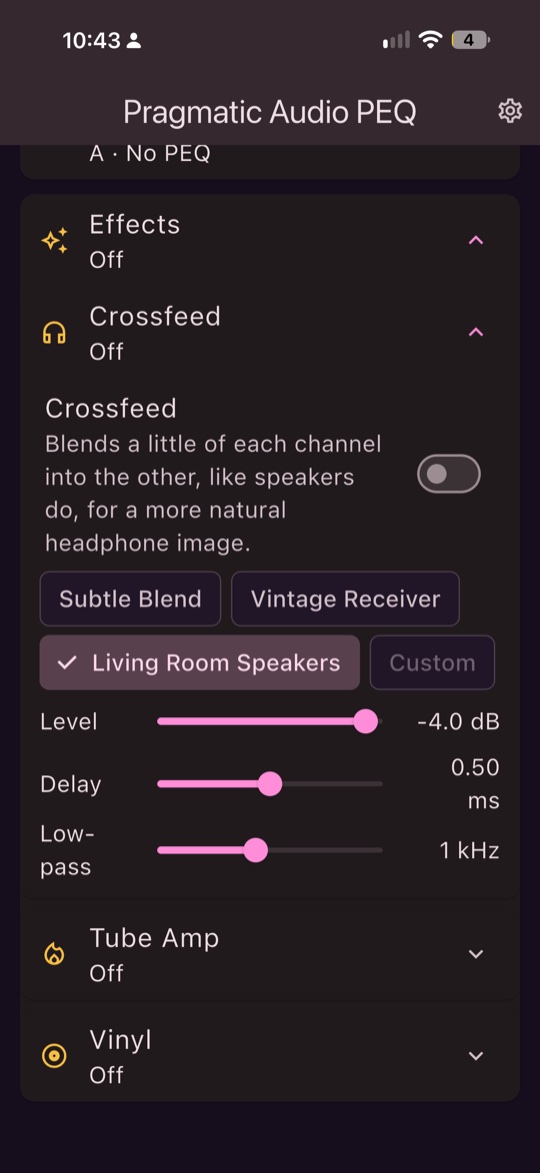 Crossfeed: Subtle Blend, Vintage Receiver or Living Room Speakers, with Level, Delay and Low-pass.
Tube Amp
A tube-style warmth effect with Drive, Bias, Sag and Mix, four presets, and four curves. Classic is a smooth bias-offset waveshaper, with the second harmonic a tube stage is known for and the odd ones as drive rises. 12AX7, 12AT7 and 12AU7 use Koren’s published triode plate-current model, with a plate load line, grid current and a little bias blocking, so the three behave differently. It is oversampled 2× so the harmonics do not fold back audibly, and small signals keep their level, so it needs no extra headroom.
It is an effect inspired by EffeTune’s saturation and amp-sag ideas, not a circuit model of a particular amplifier, and it makes no claim to sound like any specific tube amp.
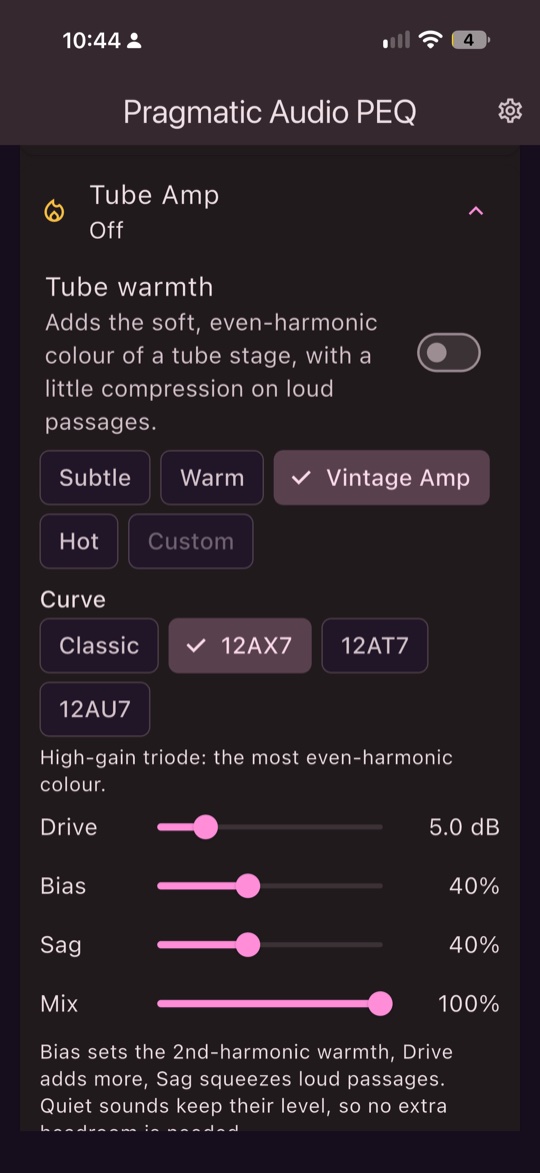 Tube Amp: presets, the curve (here the 12AX7) and Drive, Bias, Sag and Mix.
Vinyl
The character of a record, in a light form: Tone (rolls off the top), Bass mono (a cutting lathe cannot hold wide bass, so bass below a chosen frequency is made mono), Width, Wear (a softer top and a little distortion) and Noise (hiss, rumble, crackle and the odd pop), with Clean, Classic and Worn presets. EffeTune has a full physical model of record cutting and stylus tracking; this is not that. It captures the audible character with a fraction of the cost.
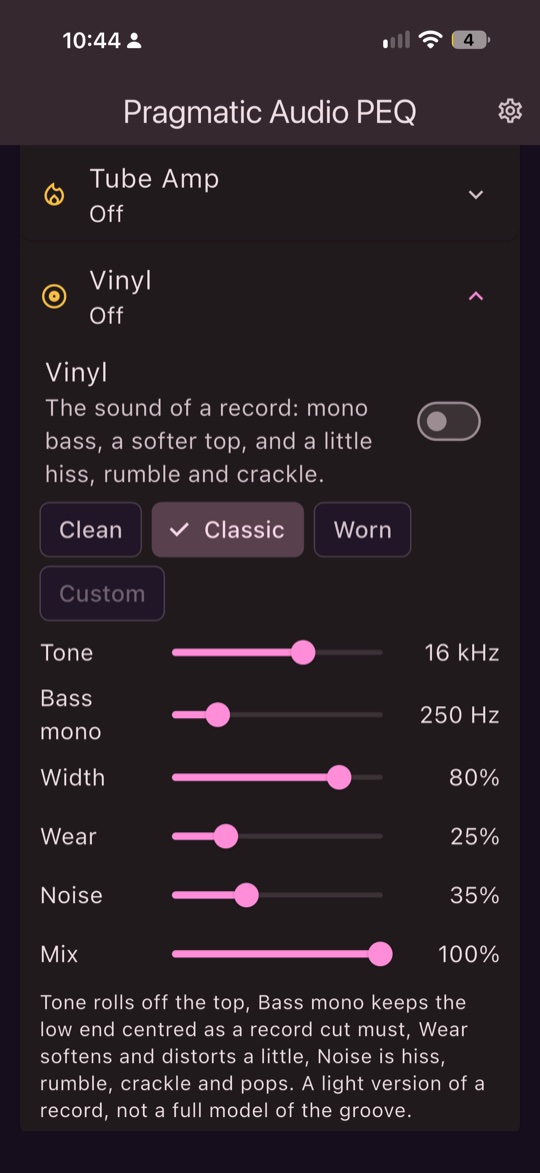 Vinyl: presets and Tone, Bass mono, Width, Wear, Noise and Mix.
Headroom: why a boosted PEQ gets quieter, and what the app does about it
A PEQ that boosts needs headroom, or the boosted frequencies clip. So the app sets the preamp for you from the filters, lowering it by the amount of the boost, which you do not have to work out or type in. That makes everything quieter.
Settings > Headroom has two modes.
- Safe reserves the worst case: a full-scale sine at the EQ’s loudest boost frequency, plus, with crossfeed on, the crossfeed’s full worst case. The EQ cannot clip.
- Smart weights each frequency’s boost by how loud music typically peaks there. Bass and mids reach near full scale. Treble does not: here it is taken as full scale up to 2 kHz, then falling 3 dB an octave to a floor of −12 dB. So a treble boost needs far less headroom than a bass boost, and you get volume back on treble-heavy PEQs. With crossfeed on it reserves only half of the crossfeed’s worst case. The output limiter catches the odd peak that gets through.
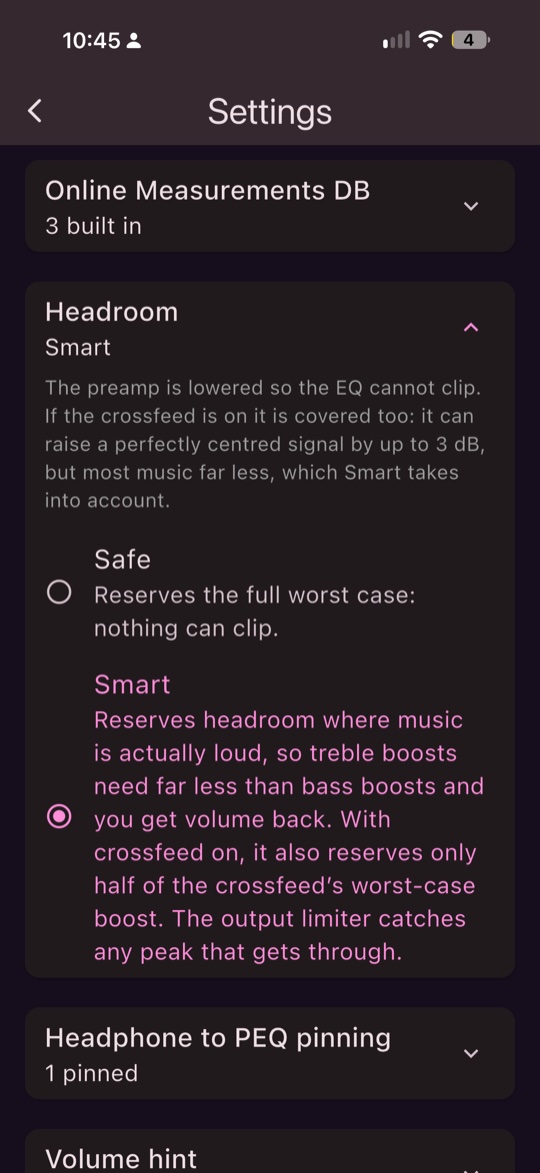 Safe or Smart. Smart is selected, and its description says what it does with crossfeed.
The limiter is the last stage: a lookahead peak limiter (about 1.5 ms of lookahead, 60 ms release, ceiling −0.1 dBFS) that eases the gain down before a peak arrives instead of flattening it. Audio stream details show if it ever had to act. On most tracks it catches a few samples in millions.
The volume hint
iOS gives apps no supported way to change the system volume, so the app does not try. Instead, inside Audio stream details, the volume hint says how much level the PEQ costs and roughly how many volume clicks to turn up: “The PEQ lowers the level by 4.5 dB to avoid clipping. Turn your volume up about 2 clicks to match.” About 3 dB a click is an estimate; it varies by output and by where the volume sits. It can be switched off in Settings.
Everything else
- iPad. In landscape, the section you open shows on the left and the Live Audio view is the default there, so the visual editing is only on screen while you are using it.
- Appearance. Light, dark or follow the system. The app icon has dark and tinted versions for iOS dark mode.
- Settings. The output name (what you see in Control Center), visualisation style and update rate, VU options, headroom, the volume hint, pinning, your bass and treble preference, and the list of measurement sites.
- About. Credits and licences.
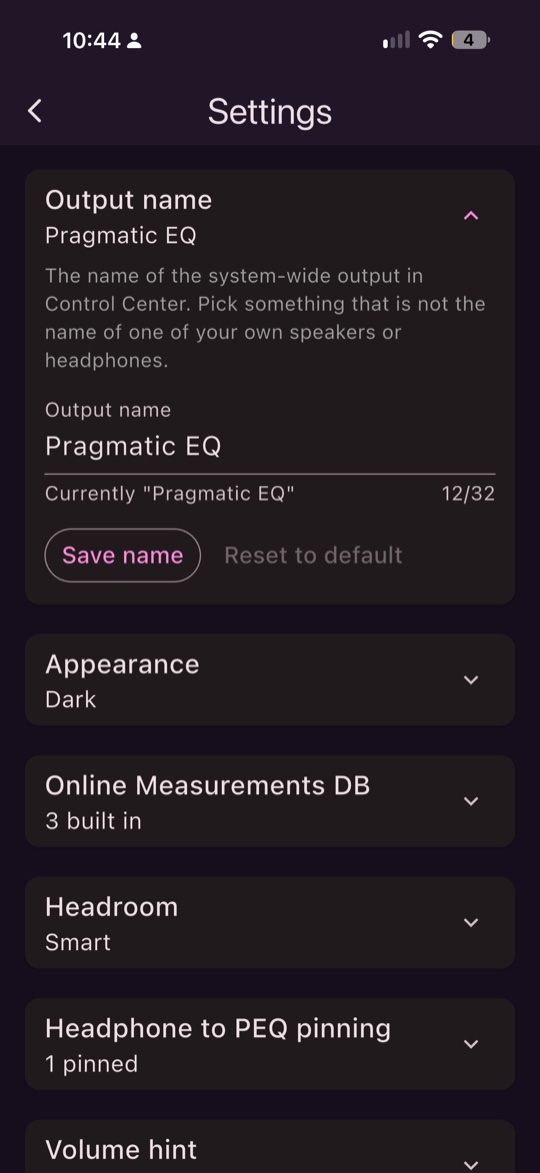 The output name is what you see in Control Center. Pick something that is not the name of one of your own speakers or headphones.
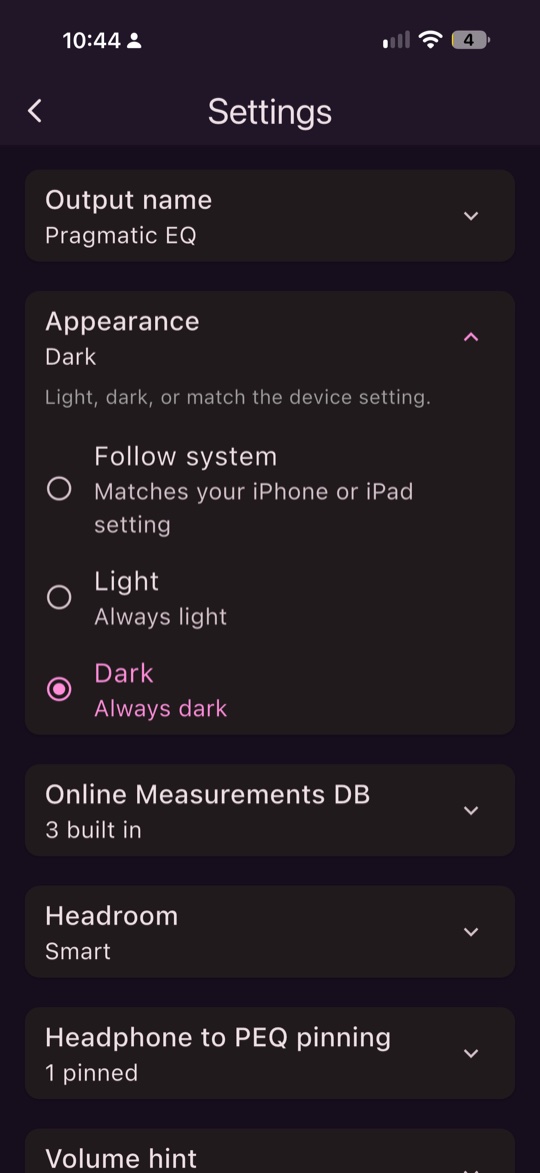 Follow system, Light or Dark.
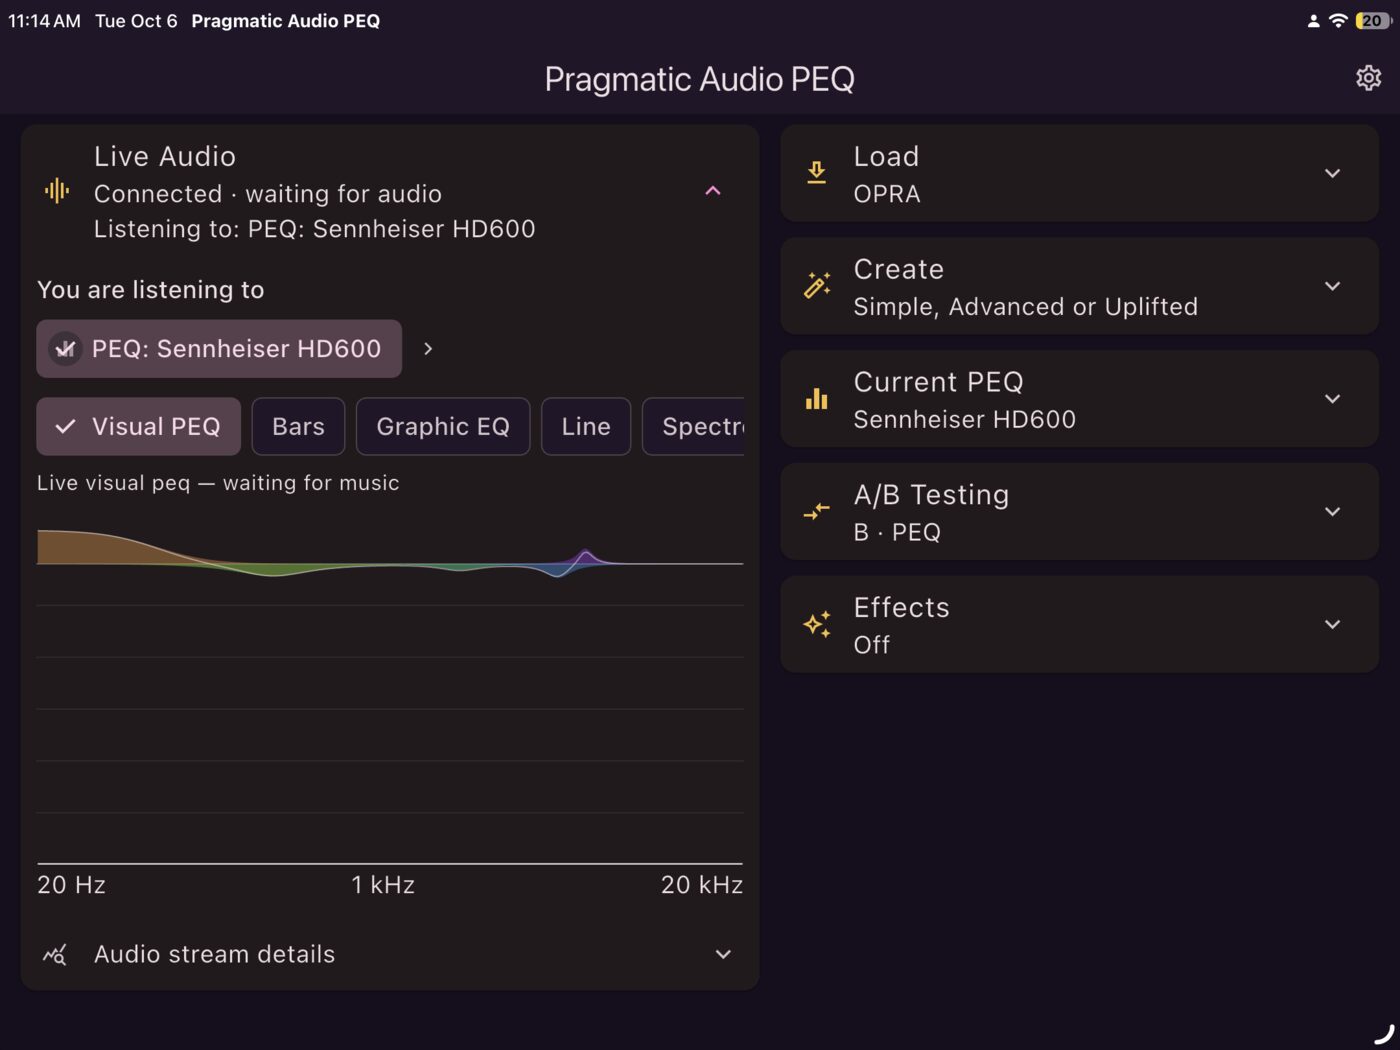 The iPad in landscape: Live Audio is open on the left, with the Visual PEQ view, and the other sections are in the list on the right.
Limits and things to know
- iOS 27 and a physical device only. The simulator has no media device extension.
- 48 kHz, 32-bit float, stereo only.
- The app must be open for the output to work.
- Apps playing video, or with a video loaded (Spotify with Canvas on, YouTube, VLC), may not connect. iOS decides that.
- Uplifting PEQ is a listening aid, not a measurement. Check it with the blind test.
- Smart headroom trusts the limiter for the occasional peak. If your music is unusually bright and loud, use Safe.
- Vinyl and Tube Amp are effects inspired by real things, not models of specific equipment.
Credits and licences
- OPRA (Roon Labs and contributors, data CC BY-SA 4.0), and every preset’s creator, such as AutoEq (Jaakko Pasanen, MIT) and Rtings.
- EffectDeck (nemut.ai, MIT) for the system-audio plumbing the extension is ported from, and EffeTune (Yoshiyuki Kobayashi, MIT) for the design of the crossfeed and the ideas behind the saturation, vinyl and spiral effects.
- Paul Kellett’s refined pink-noise filter.
- Koren’s triode model.
References
- ISO 226:2003. Acoustics: Normal equal-loudness-level contours. (A 2023 revision exists; the app uses the 2003 table.)
- Glasberg, B. R. and Moore, B. C. J. (1990). Derivation of auditory filter shapes from notched-noise data. Hearing Research, 47(1-2), 103-138.
- Hots, J., Rennies, J. and Verhey, J. L. (2014). Loudness of subcritical sounds as a function of bandwidth, center frequency, and level. Journal of the Acoustical Society of America, 135(3), 1313-1320.
- Zwicker, E. and Fastl, H. Psychoacoustics: Facts and Models. Springer.
- Kellett, P. Refined pink-noise filter (musicdsp.org archive).
- Lifting your headphone experience and DevicePEQ’s treblizer.
Who it is for
It is for someone who already cares about getting their music to sound right, and wants a measured correction for their headphones or IEMs in front of every app on an iPhone or iPad, not just the one app that has an EQ. If you keep a PEQ for each headphone and want it to load itself when you plug in or connect, the library and pinning are aimed at you. If you like checking your own judgement, the blind test and Uplifting PEQ are there for that.
It is not for you if:
- you use Android, an iPhone that cannot run iOS 27, or a simulator. The system-wide output needs the iOS 27 extension and a real device;
- you need sample rates other than 48 kHz kept all the way through. iOS converts everything to 48 kHz before it reaches the app (see the limits above);
- you mostly play from apps that iOS treats as video players, such as VLC, or Spotify with Canvas left on.
The alternatives depend on how you listen. If you only use Roon, its own PEQ is extensive and you do not need this. A USB DSP dongle or cable puts the PEQ in the hardware, so it follows the headphone to any source, including a laptop or a console. This app is for the case where the source is an iPhone or iPad and you want the PEQ to apply to everything it plays.
What is next
The app is in English for now. Translations, including Chinese, are on the roadmap for the next release.