Moondrop FreeDSP
Moondrop FreeDSP - Long term review and Tutorial
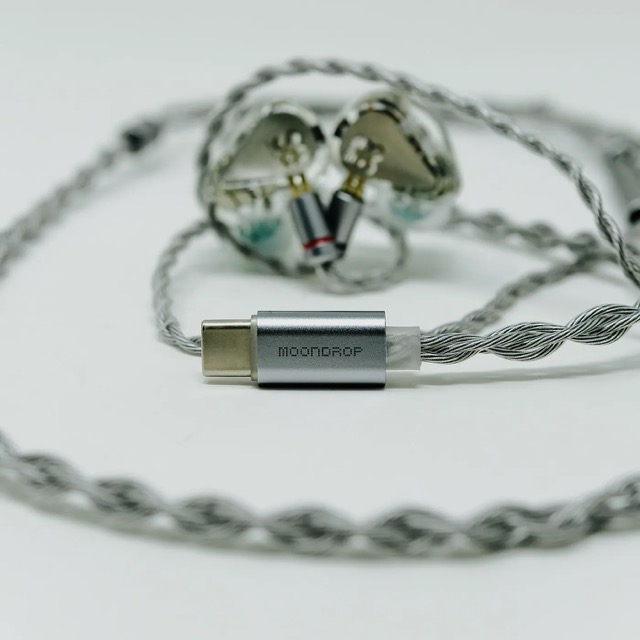 I bought the FreeDSP as soon as it was available. For me as a totally believer in PEQ and DSP this was the perfect
concept of a cable that actually can alter the sound signature. While I initially thought this would be an
ideal cable for my new usb-c enabled iPhone 15 (where we lack of a system wide PEQ capability) was always
annoying. The lack of a way to configure the Freedsp on IOS is a bit of a limitation especially for those without
any access to Android. For me, it was more an inconvenience (one of a few as you will see in this review) as I have
always carried an Android DAP (or second Android based Smartphone) for many years.
So after a few months, while I still think it’s a good product and an amazing concept, I have subsequently bought other IEM’s with similar usb-c ‘DSP cables’ like the Tanchjim One DSP and the Moondrop Chu II DSP, that strangely work a little better. But, I thought it was time to write up a brief review to show how I have used (and enjoyed) using the FreeDSP these past few months and how to live with some of its limitations.
Note: I also noticed that the new Moondrop Dusk includes both an analog and a digital cable and Crinacle has provided pre-build DSP profiles for the Dusk using a version of the same cable. This version of the cable has caused a little bit of controversy which I will get into in the measurement section.
So, lets get into the details and see if this is the right “dsp cable” for you or even if DSP cables are the type of thing that you might like to use with your IEM’s.
Build Quality
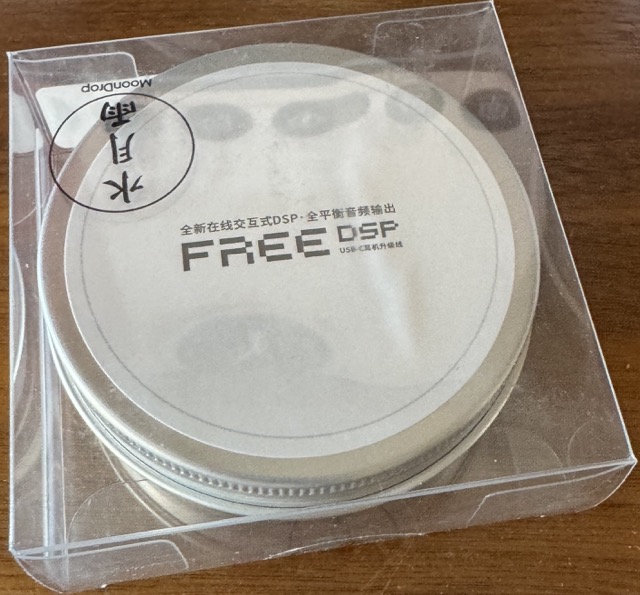
The Moondrop FreeDSP comes in a nice little ‘container’ that reminds me of a box of mints:
But once you open it up the cable itself impresses with its robust construction, particularly notable given its sub-$30 price tag. The cable boasts an all-metal build with a high-quality finish on the USB-C connector housing, 2-pin connectors, and the splitter. The cable is soft, flexible, and demonstrates minimal shape memory.
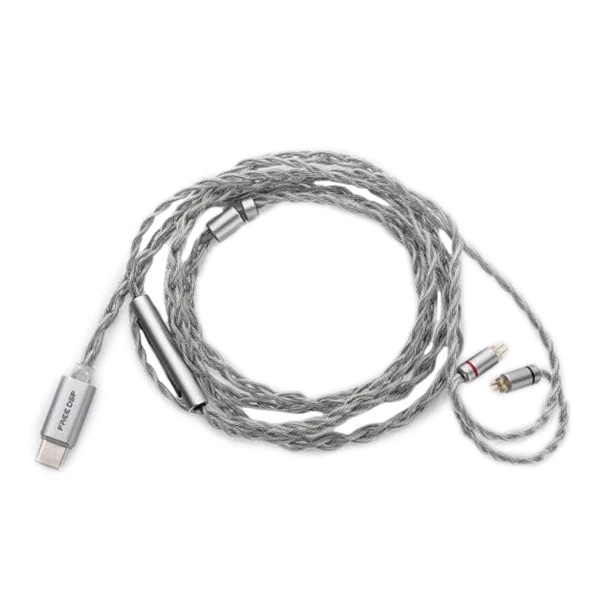
As far as build quality this is better than the dsp cables I received with the Tanchjim and the Chu II DSP (which I believe is actually the cheaper Moondrop CDSP cable packaged up with the Chu II ).
I also found the built-in microphone to be excellent quality - though I did have some problems getting IOS to recognise the microphone unlike with these other cables.
Hardware
The hardware smarts are all impressively hidden within the usb-c connector. There are very few details available about the internals of the FreeDSP connector but Moondrop does provide some information about the cable material itself.
So the cable itself is made from “Litz Structure High-purity Oxygen-free Copper Mixed Silver-plated” and the Microphone is a separate shielded cable. It is believed that the FreeDSP uses an “ARM SOC” unlike the CDSP and the Tanchjim cable which both use the KTmicro chipset.
Measurements
The Moondrop FreeDSP was subjected to a comprehensive set of measurements during the review by GoldenSound from the headphones.com team
Note: These tests were conducted using an Audio Precision APx555 B-Series analyzer.
Here are some of my key takeways from those measurements:
THD+N (SINAD)
These figures match the published AP figures from Moondrop, but it is always nice to have separate indepdently
verified measurements:
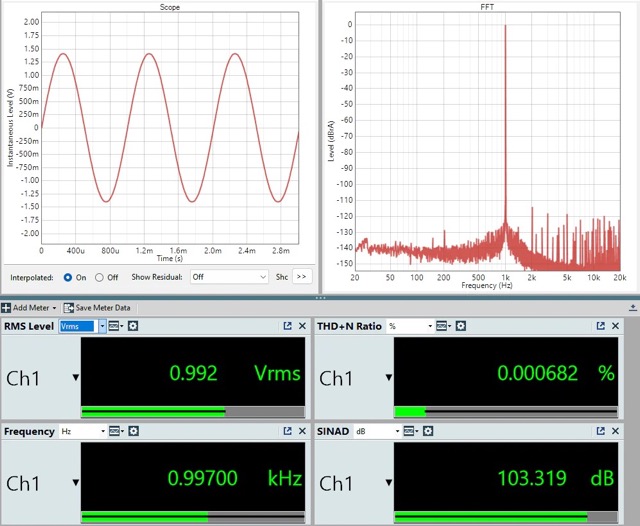 This shows excellent SINAD / THD+N score, this should have provided the FreeDSP with lots of headroom for EQ (though
as you will see the application limits the + gain of the filters to at most 3dB ).
Multi-tone test:
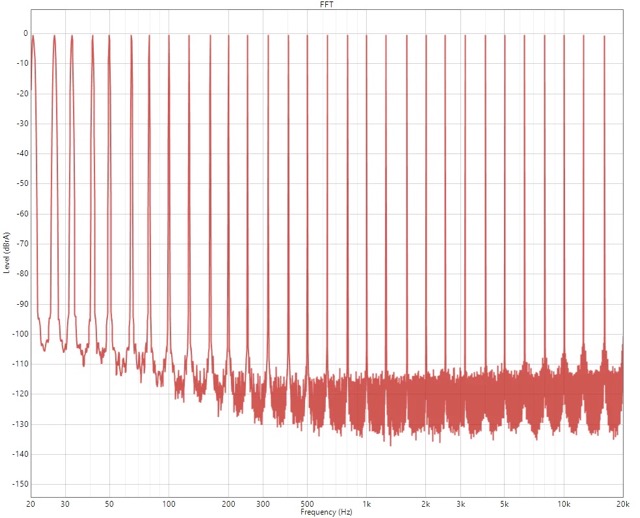 The Multi-tone test was also excellent and again it find it strange that there are some pretty crippling limits on
the PEQ filters e.g. they must be > 60Hz while in these measurements the cable does well right down to 20Hz.
Crosstalk
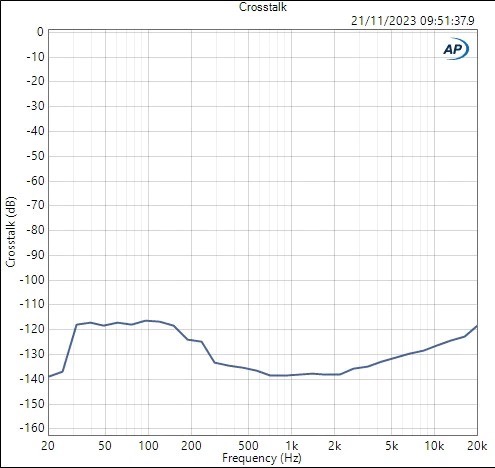 Cross talk is also excellent so the cable should preserve the soundstage capabilities of the IEM it is connected too.
Note: some early reviewers (but not all and I personally did not hear this problem on mine) were hearing slight audible artifacts in the quiet between tracks. But my sound quality evaluation I tried many different test tracks and I heard no artifacts, including ones with super dynamic range. The consensus is these audible artifacts were only an issue with a small batch from the initial production run - probably the early ones sent to these reviewers.
Sound Quality
I found when the EQ is reset to 0db, that the Moondrop FreeDSP’s sound quality to be perfectly transparent providing exactly the same experience as an analog 2-pin cable. Obviously once you start to configure the DSP you will start to hear differences but that is the point of the cable.
But as you will see in the configuration section below there are severe limitations in the values you can configure e.g. you cannot configure a filter below 60hz, so you effectively cannot change the sub-bass. You are also limited to < 10,000Hz so again if you want to manipulate the EQ to give your IEM a little treble ‘zing’ it won’t really work for you ( of course, there is nothing stopping you just increating the treble inside your music application ).
Understanding what you can and cannot do with the PEQ associated with the cable is vital to its enjoyment and what inspired me to write this review as it started as a ’tutorial’ which you will see below.
Moondrop Link Application
I see online people complain hugely about the Moondrop Link Application, but for my other Moondrop products the Application is fine, so I believe the main problem is with the ‘firmware’ on this specific cable. The Application has defintely become more stable over the past few months and mostly what I have found is that once you stay within the limits you can now get a pretty reliable experience. That said occasionally I have had to ‘reboot’ to get the Application properly applying the settings to the cable but this is now very rare and 90% of the time the Application is working reliable for me.
Here is what you can expect within the Application:
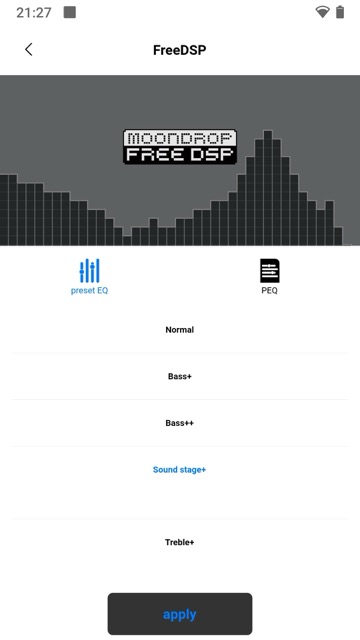
Profile ‘EQ’ selection:
The application provides a set typical ‘EQ’ like profiles e.g. Bass+
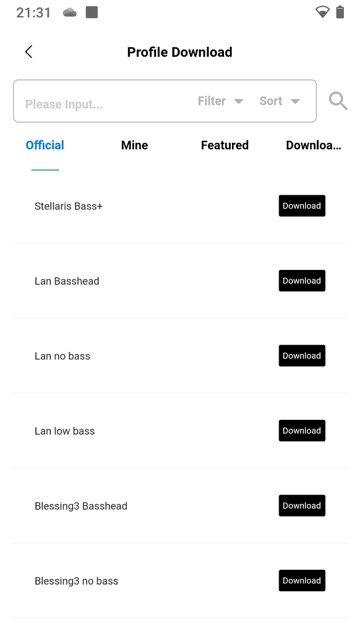
Profile Downloads:
I really like that Moondrop are building a community where people can upload EQ profiles and we can download them
within the application:
Including ‘Featuresd’ EQ:
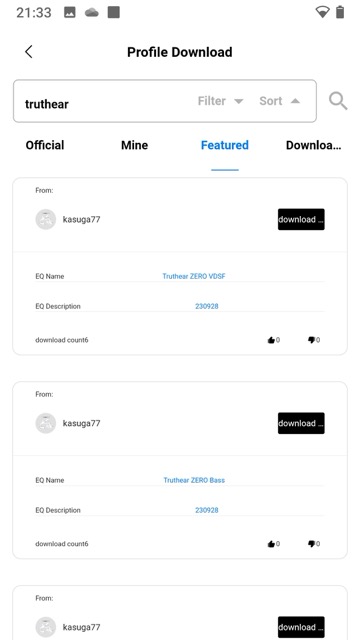
Then finally once you have loaded a EQ profile you get the chance to edit the values. We will see this screen again
in the tutorial later on:
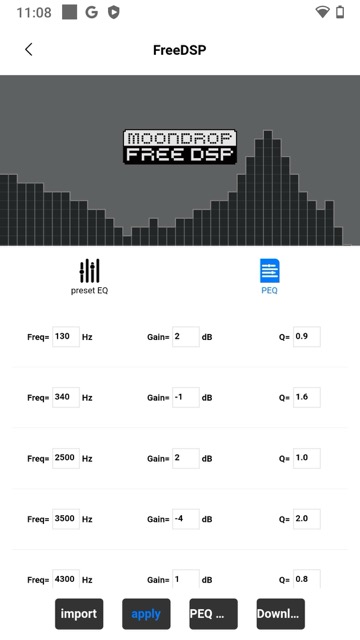
I found the limited Frequency Range (60Hz to 10000Hz) and the max +3dB gain per filter the biggest limitations but the lack of a global gain also makes it difficult to get a perfect DSP experience.
But let’s get on with a ‘pratical tutorial’ of how to use the FreeDSP cable.
Tutorial in using the FreeDSP
Note: I found it interesting with new Moondrop Duck Crinacle colab that great effort was made to get the ’native’ sound of the earbuds (i.e. as heard with just the Analog table provided ) to be almost perfect and then the FreeDSP cable shipped with the Dusk was for that last bit of subtle tuning. This is effectively what I am suggesting with this tutorial
Step 1. Selecting the IEM to use with the FreeDSP
So first, you should select one of your IEMs to use with the FreeDSP, I would pick one with good measurements / frequency response already. Given that you can only increase the gain by 3db it is best to pick an IEM with close to your ideal sound signature. IMO, don’t pick a neutral sounding IEM with no bass, especially if you will want to increase the bass as that +3dB limitation will get you. Also pick one with good treble response as again you cannot really adjust the upper treble regions. So pick a Harman or similar tuned IEM and one with little distortion as PEQ can effect the distortion you hear (though the +3dB gain probably means it won’t).
If you pick a V-Shaped IEM again don’t except the PEQ to fill in that midrange again because of the +3dB limit.
Finally, make sure to pick an IEM that already has lots of measurements published as we will be using some publish measurements to create a ‘relative’ PEQ.
So for this tutorial I decided to pick the Truthear Zero Red as almost all reviewers have measured and published the results on their Squiq.link pages already.
Step 2. Pick a ’target’
So this is where it can be ‘fun’ to EQ your IEM. So obviously you could turn your paired IEM into a V-Shaped by lowering the midrange, the -10dB should give you ample ability to do that and ‘sculp’ a unique sound. But for me, I find it more interesting and fun to see can we use one of the ‘current’ hyped IEM’s as the Target.
Note: Due to the limitations both of the EQ here and the mesasurement accuracy this exercise will never give you exactly the same experience of that ‘hyped’ IEM, but you will get an ‘idea’ / taste which I think is fun and useful
So, lets pick a ’target’ for the FreeDSP to transform the Truthear Zero Red into for this tutorial. At the time of writing I decided to see how close I could get to the new Moondrop Dusk ‘default’ DSP tuning (which was getting lots of praise by various earlier reviewers). The advanage here is it is also heavily measured
Step 3. Pick an accurate set of measurements
So its beyond crucial to use the 2 set of measurements done on the same measurement rig and probably by the same person, this will at least remove the difference related to different rigs. Ideally, both measurements should be aligned so that ‘standard’ of 8000Hz resonance peak (credit to Crinacle for this ‘standardisation’) is a good idea.
Ideally 2 BK-5128 measurement would be used for more accuracy but in this tutorial I decided to my SuperReview own Squig website (using his 2 measurements of these IEMs for that relative PEQ filters):
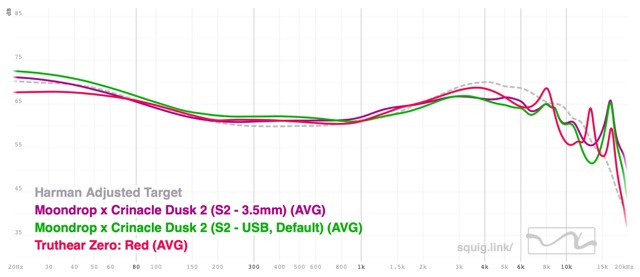
I decided to graph the analog measurement from the Dusk as well as the usb ‘default’ which is the preferred sound signature and the one I really wanted to see could I get close too with the FreeDSP cable.
Step 4. Download the ‘Target’ IEM measurement to use as a ‘Target Response’
Next download the Dusk DSP measurement using the ‘Download’ button next to it in the list. Remember the location and name of the downloaded file as we need it for the next step.
Step 5. Upload this as a Target
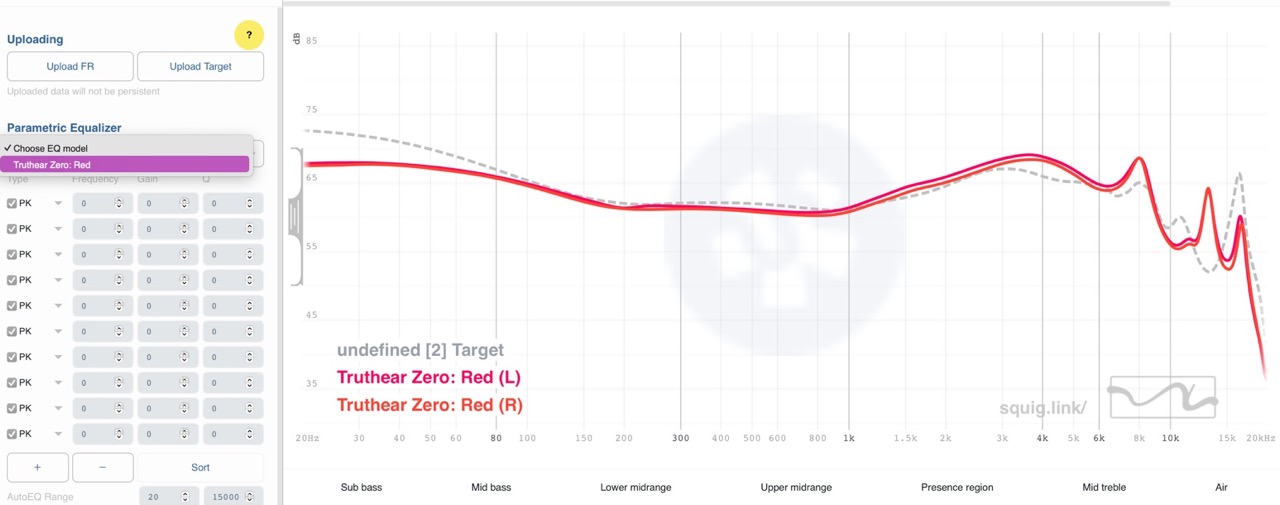
Once you have this ‘Target’ downloaded, remove all the measurements except for the Truthear Zero Red and switch to the
“Equalizer” tab and then upload this measurement as your ‘Target response’:
Step 6. Prepare the EQ for the limitations of the FreeDSP
Before we calculate the EQ using “AutoEQ” we need to take into account the limitations of the FreeDSP so first limitation is the frequency range so make the range be from 60 to 10000 hz so that the EQ generated will be within the range valid for the FreeDSP cable.
Step 7. AutoEQ to this target
Select the Truthear in the Dropdown and then click the “AutoEQ” button:
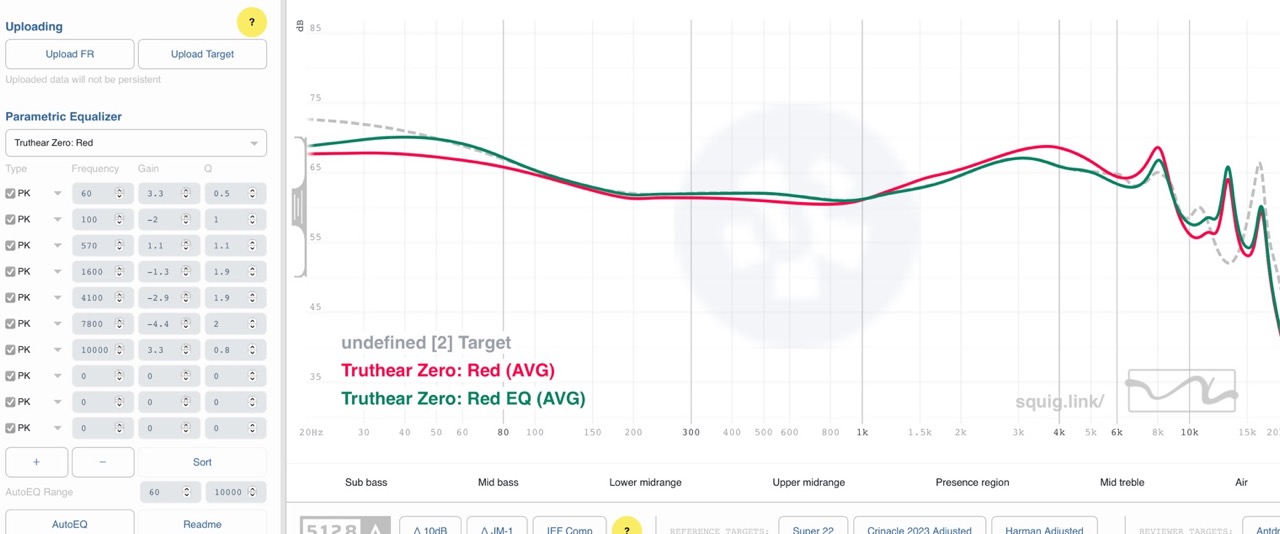
Step 8. Fine tune the resulting EQ
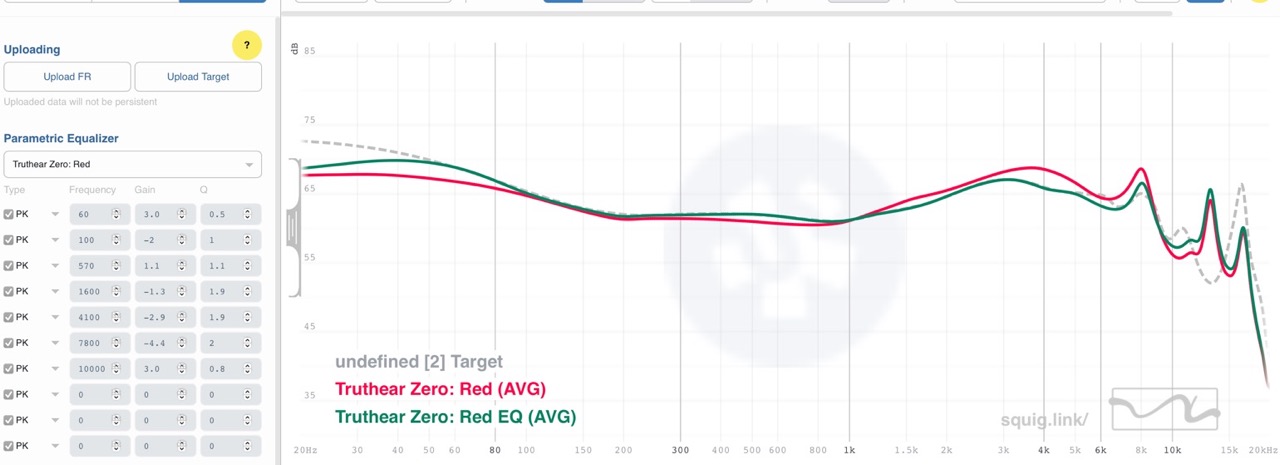
So there will probably still be some problems which will stop this generate EQ from working on the FreeDSP cable. In my example above you can see there are 2 entries with gain values of +3.3db, so we need to bring these down to 3.0 db. This wasn’t bad but if you see more dramatic values you might want to try a different IEM to use as a basis.
This leads to this result:
Step 9. Review the result before exporting
So, looking at the final graph does sadly show a few problems, specifically the sub-bass doesn’t match because we only have Peak Filters to play with and we cannot set a filter below 60Hz.
The other problem is the Dusk has a significant different upper treble, and we cannot make the Zero Red match this and since we cannot rely on measurements in this region we will just have to live with what we get from the Zero Red in this region.
So this effectively means while we can use the FreeDSP to get close and ’trial’ the sound of the Dusk and if you like it, you really should still go and get the Dusk to have an even better experience.
Step 10. Exporting and entering the result
So final step is to export this measurement and load it onto your FreeDSP cable. I found I had to do this by hand as the Moondrop Link Application would not always ‘import’ the exported file. So I just opened up the values into a text editor and switched over to Android.
These were the filter values (you cannot enter the Gain so you can ignore that line)
Preamp: -2.3 dB
Filter 1: ON PK Fc 60 Hz Gain 3.0 dB Q 0.500
Filter 2: ON PK Fc 100 Hz Gain -2.0 dB Q 1.000
Filter 3: ON PK Fc 570 Hz Gain 1.1 dB Q 1.100
Filter 4: ON PK Fc 1600 Hz Gain -1.3 dB Q 1.900
Filter 5: ON PK Fc 4100 Hz Gain -2.9 dB Q 1.900
Filter 6: ON PK Fc 7800 Hz Gain -4.4 dB Q 2.000
Filter 7: ON PK Fc 10000 Hz Gain 3.0 dB Q 0.800
Filter 8: OFF PK Fc 0 Hz Gain 0.0 dB Q 0.000
Filter 9: OFF PK Fc 0 Hz Gain 0.0 dB Q 0.000
Filter 10: OFF PK Fc 0 Hz Gain 0.0 dB Q 0.000
So on Android launch the Moondrop, and ideally you would use the import button on the PEQ screen, but I found this very unreliable, so I would just enter these values manually - definitely a pain and I am sure its something Moondrop are working to fix.
So for me the values looked like this on the PEQ page:
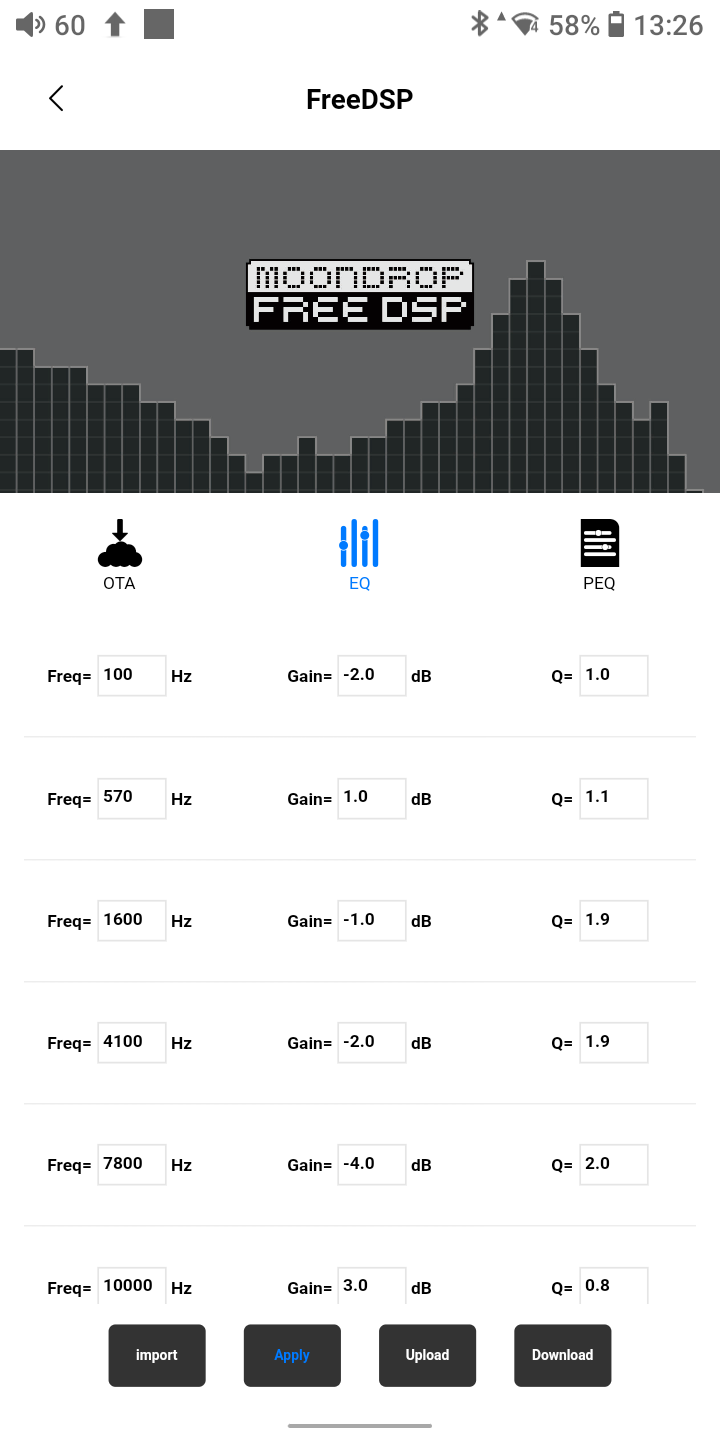
Once you “Apply” the setting you should see a “Success” message popup - if you get a “Disconnected” it probably means one of the values is invalid or possible you need to restart the Moondrop application.
So it’s not the simplest process, but I believe its worth it use the FreeDSP to ’try out’ a close sound signature of other IEMs.
Rating
I believe these cables are the future, and we will see more and more of these cables, I gave the FreeDSP a pragmatic rating of 4 mainly because it is effectively the first such cable and I can forgive its quirks as Moondrop will no doubt be iterating and making it better. I can’t wait to see what this technology will provide in the next few years.
Conclusion
The Moondrop FreeDSP is not without its issues, but I do think its nice cable to allow you to experiment with DSP and once you follow the process I outlined in this review / tutorial you should be able to get the most out of the FreeDSP cable.